
Migrating from WordPress to Jekyll
05 Dec 2015Why
After years of running my own WordPress instance on a VPS I decided to call it quits. Maintaining a server just for running a simple blog kind of got tiring. I spend enough time worrying about backups, security, availability, etc in my day job. Not to mention I was paying more than I pay for my monthly Netflix subscription to keep a resource hog like WordPress humming along.
Although I still liked the hackability of WordPress, so moving to something like Medium or hosted WordPress didn’t seem too appealing.
Search
After a bit of Googling, I decided to go with a static site generator. I liked the idea of being able to host the site virtually for free while retaining full control over the look and feel.
There are many static site generators out there but given Jekyll’s community and my familiarity with the Ruby ecosystem, it was an easy choice. Jekyll would allow me to tinker with the platform without worrying about tedious maintenance.
Now that I had settled on a new home for this blog, I had my work cut out for me. Here’s how I went about the migration:
Data Export
So the first task was figuring out how to get the existing posts out of WordPress. There are couple of options:
-
jekyll-import gem supports importing posts from WordPress among many other platforms and gives you a good amount of control over what you want to import.
-
Jekyll Exporter is a WordPress plugin which makes the job even easier. It packages everything up in a nice zip that you can download and drop into Jekyll.
I went with the latter option since it saved me the trouble of installing Ruby on my VPS or opening up my DB to accept external connections.
Look & Feel
Now that I had the basics figured out, I started looking for a nice theme that I could use as a jumping off point. I browsed Jekyll Themes to find Hyde, a carefully crafted theme built by Mark Otto.
“Installing” the theme was pretty straight forward, I just forked the repo and dropped the contents of my _posts folder in there.
Customizations
After getting the theme up and running. I went about making a few modifications of my own:
-
Changed the default homepage to be a landing page rather than a blog. It involved moving the main index.html into blog/index.html and creating a new index.md at the root with custom landing page content. I had to create a blog folder because of this bug (or feature?) where paginator is only made available in index.html
-
Added a custom archive page. I borrowed the markup for it from Reyhan Dhuny’s post with some minor adjustments of my own.
-
Changed the default syntax CSS for Pygments with the one found here.
-
Made some tweaks for SEO such as adding a sitemap using the jekyll-sitemap gem. Also added standard meta tags and Google Analytics for tracking. I also plan to implement post specific meta tags at some point.
-
Added a call to action at the bottom of every post inspired by Joshua Lande’s excellent post about his own experience moving to Jekyll.
Hosting
Now the last step was figuring out where to host this site. Official Jekyll website has pretty much documented all the deployment options out there. Simplest one out of them was to use GitHub Pages which comes with built in support for Jekyll and it’s free!
All you have to do is create a repository named username.github.io, where username is your GitHub username. Once you commit your project, it will automatically be deployed to http://username.github.io URL.
You could also have your custom domain point to that location. Just have to create an A record pointing to GitHub Page’s IP in the DNS settings and add a CNAME file at the root of your project with your domain listed in it. You can find detailed instructions here.
That was super easy to setup and only took a couple of minutes. Although one thing to keep in mind, GitHub Pages use Jekyll 2.x. So if you are working on Jekyll locally, you’ll want to add github-pages to your Gemfile so the local version of Jekyll and its dependencies are in sync with what GitHub Pages uses to avoid any inconsistencies based on environment.
Moving Forward
One thing I missed was having a nice WordPress editor where I could work on draft post as and when I please.
Luckily I was able to setup a very similar workflow using prose.io which is an excellent content editor for GitHub specifically designed for static websites like this. It has many configuration options allowing you to setup live previews, image uploading, etc. Definitely worth checking it out.
Lastly I’ve leave you with this screenshot of one of the metrics from my Google Webmaster Tools account.
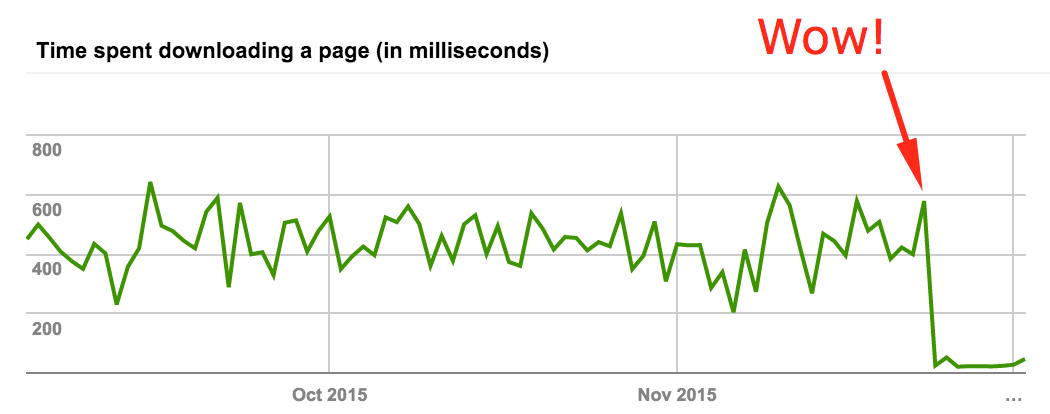
That huge drop in page download time is, as you’d guess, right after I made the switch to Jekyll. I’m hoping that will eventually also translate into a bump in the search rankings as I’ve read Google now considers speed as one of the small factors in determining the results.
Anyway, that’s it for now. Stay tuned with more updates on my adventures with Jekyll and it’s ecosystem.