
Incorporating Modern Javascript Build Tools With Rails
06 Mar 2017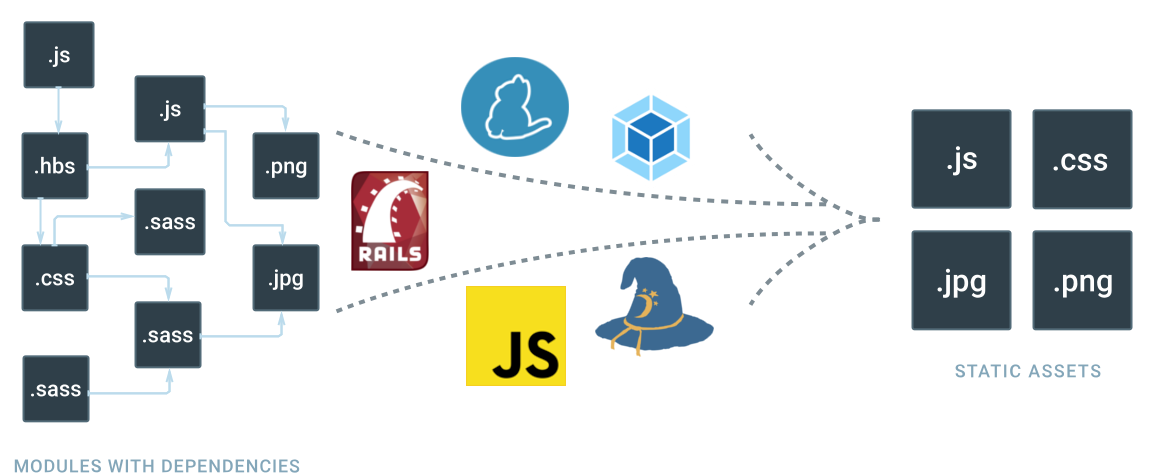
Recently I’ve been working on ways to bring modern JavaScript development practices into an existing Rails app.
As RoR developers know, Sprockets is a powerful asset pipeline which ships with Rails and thus far has JustWorked™. Although with the JavaScript ecosystem maturing in the recent years, Sprockets hasn’t been able to keep pace with the flexibility and feature set of it’s competitors. While Sprockets might have originally popularized the asset pipeline model, it was finally time to hand the reigns to it’s prodigies.
So having said that, I started searching for a viable replacement to Sprockets. My research came up with two main contenders, namely Browserify and Webpack. Here’s my experience integrating each one with a Rails app.
NodeJS
Before we can get started, let’s make sure we have NodeJS installed. I’ve found the easiest way to do so is via nvm. Rails developers will find this very similar to rvm. To install, run the following commands which will install nvm and the latest version of NodeJS:
$ curl -o- https://raw.githubusercontent.com/creationix/nvm/v0.32.1/install.sh | bash
$ source ~/.bash_profile
$ nvm install node
$ nvm use node
Yarn
Next we’ll need a package manager. Traditionally we’d use npm but I’ve found Facebook’s yarn to be a lot more stable and reliable to work with. This is very similar to bundler. To install on Debian Linux, run the following commands or follow their installation guide for your OS:
$ curl -sS https://dl.yarnpkg.com/debian/pubkey.gpg | sudo apt-key add -
$ echo "deb https://dl.yarnpkg.com/debian/ stable main" | sudo tee /etc/apt/sources.list.d/yarn.list
$ sudo apt-get update && sudo apt-get install yarn
Browserify
Now that we have the essentials available. Let’s first try Browserify. The main objective of Browserify is to bring the ability to “require” and use NodeJS packages in the browser and bundle all their dependencies for you.
Getting Browserify integrated into Rails is surprisingly simple thanks to the browserify-rails gem. So let’s get started by adding it to our Gemfile and creating a package.json for all it’s required JS dependencies.
Gemfile
gem 'browserify-rails'
package.json
{
  "name": "myapp",
  "version": "0.0.1",
  "license": "MIT",
  "engines": {
    "node": ">= 0.10"
  },
  "dependencies": {
    "babel-preset-es2015": "^6.1.18",
    "babelify": "^7.2.0",
    "browserify": "~> 10.2.4",
    "browserify-incremental": "^3.0.1"
  }
}
Although instead of copy/pasting the dependencies from the package.json above I’d recommend using yarn add [package-name] command so you can get the latest as the versions listed above might get stale over time.
All you have to do now is run the two package managers bundle install & yarn install to finish the setup.
Usage
You can now start to define and export your own module or you can use a CommonJS compatible library and require it in your application manifest right alongside Sprockets’ require syntax:
assets/javascript/foo.js
export default class Foo {
  constructor() {
  console.log('Loaded Foo!')
  }
}
assets/javascript/application.js
MyApp.Foo = require('./foo'); // <--- require via Browserify
//= require bar               // <--- require via Sprockets
That’s pretty much all there is to it. So while getting Browserify up and running was easy, it wasn’t designed to be a complete asset pipeline replacement. You could technically set that up in conjunction with Gulp or npm scripts but it’s not something it was designed to do out of the box.
Webpack
I was hoping to go a little further than what Browserify offered with a complete asset pipeline replacement out of the box.
So having that in mind, I started looking into Webpack. It’s motto of only load what you need, when you need sounded pretty compelling.
Especially with DHH working on bringing Webpack and Yarn to Rails 5.1 which is great news and makes it a solid choice as far as future-proofing goes.
So let’s see how to get Webpack integrated right now in Rails 4.x before it becomes more formally integrated into Rails 5.
Gemfile
gem 'webpack-rails'
gem 'foreman'
package.json
{
  "name": "myapp",
  "version": "0.0.1",
  "dependencies": {
    "babel-core": "^6.9.0",
    "babel-loader": "^6.2.4",
    "babel-preset-es2015": "^6.9.0",
    "extract-text-webpack-plugin": "^1.0.1",
    "resolve-url-loader": "^1.6.0",
    "stats-webpack-plugin": "^0.2.1",
    "webpack": "^2.2.1",
    "webpack-dev-server": "^2.3.0"
  }
}
Now all you have to do is run the two package managers bundle install & yarn install to finish the setup.
Although we are not done, next let’s create a config file which will define how our Webpack asset pipeline will work.
config/webpack.config.js
'use strict';

var path = require('path');
var webpack = require('webpack');
var StatsPlugin = require('stats-webpack-plugin');

// must match config.webpack.dev_server.port
var devServerPort = 3808;

// set NODE_ENV=production on the environment to add asset fingerprints
var production = process.env.NODE_ENV === 'production';

var config = {
  name: 'js',
  entry: {
     //Define entry points here aka manifests
    'application': './webpack/javascript/application.js',
  },
  output: {
    path: path.join(__dirname, '..', 'public', 'webpack'),
    publicPath: '/webpack/',
    filename: production ? '[name]-[chunkhash].js' : '[name].js'
  },
  resolve: {
    modules: [
      path.join(__dirname, '..', 'webpack', 'javascript'),
      "node_modules/"
    ]
  },
  plugins: [
    new StatsPlugin('manifest.json', {
      chunkModules: false,
      source: false,
      chunks: false,
      modules: false,
      assets: true
    })],
  module: {
    rules: [
      {
        test: /\.js$/,
        exclude: /node_modules/,
        use: [
          {
            loader: 'babel-loader',
            options: {
              cacheDirectory: true,
              presets: ['es2015'] // Use es2015-without-strict if legacy JS is causing issues
            }
          }
        ]
      }
    ]
  }
};

if (production) {
  config[0].plugins.push(
    new webpack.NoErrorsPlugin(),
    new webpack.optimize.UglifyJsPlugin({
      compressor: {warnings: false},
      sourceMap: false
    }),
    new webpack.DefinePlugin({
      'process.env': {NODE_ENV: JSON.stringify('production')}
    }),
    new webpack.optimize.DedupePlugin(),
    new webpack.optimize.OccurenceOrderPlugin()
  );
} else {
  var devServer = {
    host: '0.0.0.0',
    port: devServerPort,
    headers: {'Access-Control-Allow-Origin': '*'},
    watchOptions: { //You will need this if you are a Vagrant user
      aggregateTimeout: 0,
      poll: 10
    }
  };
  config.devServer = devServer;
  config.output.publicPath = '//localhost:' + devServerPort + '/webpack/';
  config.devtool = 'sourceMap';
}

module.exports = config;
So that’s a whole lot of configuration! But as long as you understand the Four Core Concepts of Entry, Output, Loaders & Plugins behind Webpack it will all start to make more sense.
As far as a Rails/Sprokets analogy goes, you can think of an Entry as a Manifest file and the Output as the final asset file which is produced as a result of compiling the manifest.
Everything in between is handled by Loaders which execute transformations on individual files and Plugins which execute transformations on a set of files.
Webpack offers a rich ecosystem of loaders and plugins which can perform a variety of transformations which is where the true power and flexibility of Webpack becomes apparent.
Usage
So now that we are done setting this up, let’s see how to put it in use. Unlike Browserify which only supported CommonJS modules, Webpack allows mixing and matching Harmony (ES6), AMD or CommonJS syntax for module loading:
webpack/javascript/foo.js
define ('Foo', [], function() {
 return function () {
   __construct = function(that) {
     console.log('Loaded Foo!')
  } (this)
 }
}
webpack/javascript/application.js
MyApp.Foo = require('./foo');
views/layouts/application.html.haml
<%= javascript_include_tag *webpack_asset_paths('application', extension: 'js') %>
So that’s the basic setup. Next time when we start Rails, we’ll also need to start the webpack dev server which will serve the assets locally and rebuild them if they change.
For convenience, I would recommend using foreman so we can just start both Rails and Webpack with foreman start, here’s the Procfile you would need to declare before running the command:
Procfile
# Run Rails & Webpack concurrently
rails: bundle exec rails server -b 0.0.0.0
webpack: ./node_modules/.bin/webpack-dev-server --no-inline --config config/webpack.config.js
Deploy
Deploying Webpack into production is fairly staright forward. Similar to Sprockets’ rake assets:precompile task, webpack-rails gem provides rake webpack:compile task which can run in a production build script and will compile and place the assets into a location specified in our config.output option, in this case, it will be inside public/webpack folder of our Rails application.
Conclusion
So that convers the basics of setting up a modern asset pipeline in Rails. I think Browserify is great if you want to just use some ES6 features and NodeJS packages but don’t really want to necessarily overhaul the entire asset pipeline. On the other hand, Webpack is a bit more difficult to configure but it provides the most amount of flexibility and it has all the features necessary to become a complelete asset pipeline replacement.