
Optimizing front-end delivery with Webpack 4
06 May 2018With the latest major Webpack release (version 4.x), we are at a point where you don’t need a config to get started. It is optimized by default (#0CJS!). So plugins that had to be manually added and configured like CommonsChunkPlugin,UglifyjsWebpackPlugin, etc are automatically instantiated by Webpack under the hood which makes life easier!
Although there are a few things we can still do to make sure we are getting the most out of Webpack. Let’s go through them one by one.
Mode
Webpack 4 comes with two modes: production and development. Running webpack with the flag --mode development|production or setting that in the config file enables bunch of optimizations by default:
| Option | Description |
|---|---|
development |
Provides process.env.NODE_ENV with value development. Enables NamedChunksPlugin and NamedModulesPlugin. |
production |
Provides process.env.NODE_ENV with value production. Enables FlagDependencyUsagePlugin, FlagIncludedChunksPlugin, ModuleConcatenationPlugin, NoEmitOnErrorsPlugin, OccurrenceOrderPlugin, SideEffectsFlagPlugin and UglifyJsPlugin. |
So no need to manually include those plugins or set the NODE_ENV using the DefinePlugin, that’s all taken care of when using mode.
By the way, if you still want to pass custom params to the UglifyJsPlugin, which I found myself wanting to, you can do so by installing it: npm install uglifyjs-webpack-plugin --save-dev and then specifying your custom params in the Webpack config:
const UglifyJsPlugin = require('uglifyjs-webpack-plugin');

if (process.env.NODE_ENV === 'production') {
  config.optimization = {
    minimizer: [
      new UglifyJsPlugin({
        parallel: true,
        cache: true,
        sourceMap: true,
        uglifyOptions: {
          compress: {
            drop_console: true
          }
        },
      }),
    ],
  };
}
That will basically override Webpack’s default minimizer instance with your own so you have full control over it.
That config will make sure uglifier runs in parallel mode, caches output to reuse in the next build, generates source maps and suppresses comments in the console when running in production mode. You can find the full list of available options here.
Hashes
By default, Webpack will not add cache busting hashes to the output filenames (eg, index.7eeea311f7235e3b9a17.js). So your users might not get the latest code the next time you do a release which could result in a lot of strange behavior and bugs.
So in order to refresh your assets after every build, you can add the hash in the filename:
module.exports = {
  entry: {
    vendor: './src/vendor.js',
    main: './src/index.js'
  },
  output: {
    path: path.join(__dirname, 'build'),
    filename: '[name].[hash].js'
  }
};
Although if you think about it, that seems a bit heavy-handed. What if there are no changes in your vendor.js, it would be nice if Webpack was smart and only updated the hash of chunks that have changed. That way the client doesn’t have to download all the assets again every time we push out a new build even if nothing has changed.
In order to ensure that happens, Webpack provides chunkhash. Chunkhash is based on the contents of each entry point rather than the entire build. Using that is just as easy:
module.exports = {
  ...
  output: {
    ...
    filename: '[name].[chunkhash].js'
  }
};
This will make sure we are getting the best of both worlds. When a new release goes out, the client will fetch the updated files while still using the cached version of the files that haven’t changed.
Babel
Transpiling
Since not every browser supports ES6/7/Next features, navigating what would work and wouldn’t on browsers quickly becomes a minefield:
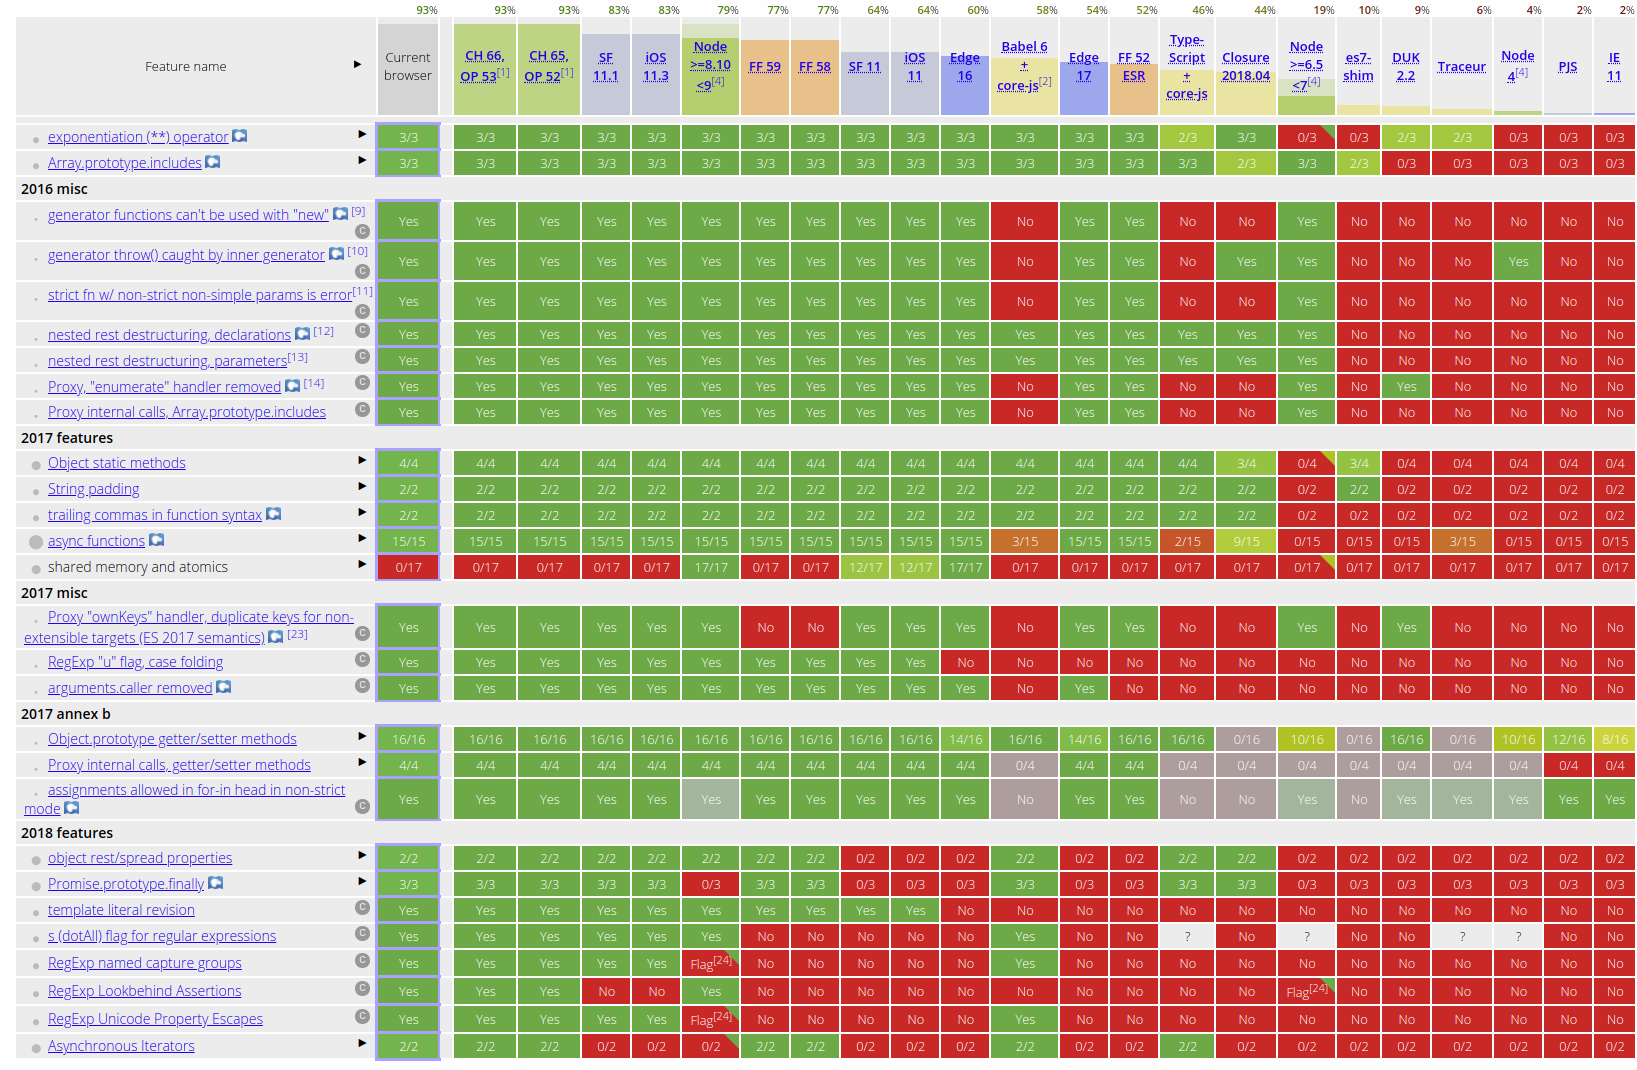
So that’s where Babel comes in. It provides some amazing plugins that make writing modern JavaScript a breeze by transpiling (converting) modern JS into something that will work on every browser we specify.
You’d set that up by installing: npm install babel-core babel-loader babel-preset-env --save-dev
Now you can tell Babel which browsers we want to target in plain English (using browserslist syntax) in .babelrc at the root of your project folder:
{
  "presets": [
    ["env", {
      "targets": {
        "browsers": ["last 2 versions", "safari >= 9"]
      }
    }]
  ]
}
This is possible using the env preset which automatically determines the Babel plugins you need based on the environments you’ve specified.
Lastly, we’ll want to let Webpack know what we want to transpile all our JavaScript with Babel:
module.exports = {
  module: {
    rules: [
      {
        test: /\.js$/,
        exclude: /node_modules/,
        use: {
          loader: "babel-loader",
          options: {
            cacheDirectory: true
          }
        }
      }
    ]
  }
};
Now you can use all the latest JavaScript syntax worry-free as Babel will take care of browser compatibility.
Dynamic imports
So the next advantage of using Babel is performance related. We can use it’s dynamic import plugin to load large dependencies asynchronously only when you need them aka lazy loading. This can make a dramatic impact on the size of your entry point file since Webpack doesn’t have to load the entire dependency tree at once.
You’d set that up by installing: npm install syntax-dynamic-import --save-dev and then adding that to your .babelrc
{
  "presets": [
    ...
  ]
  "plugins": ["syntax-dynamic-import"]
}
So now a module that looks like this:
import foo from 'foo'
import bar from 'bar'
import baz from 'baz'

const myfun = () => {
  //Do something with the modules here
}
can be converted to this:
const myfun = () => {
  return Promise.all([
    import('foo'),
    import('bar'),
    import('baz'),
  ]).then(([foo, bar, baz]) => {
    //Do something with the modules here
  });
};
Webpack will recognize those dynamic imports and code split those into separate chunks. They will be loaded async once myfun is called at runtime. This will make sure our initial chunk size remains small and the client doesn’t have to download resources that it may not even need.
Side note, if you are using Vue this is supported out of the box with Async Components but of course, if you are dealing with a large app with various frameworks that alone will not suffice so you will need a generic solution like this.
Preload
Now that we have optimal code-splitting, one downside is that the client still has to load those dependencies at runtime potentially slowing down the responsiveness of your app. So in the example above, when we call myfun, the client first has to load foo, bar and baz before it can execute the function.
What if we could preload those dependencies in the background so by the time we call myfun those dependencies are already available and ready to go? That’s where the preload plugin comes in.

It uses the Preload web standard to declaratively let the browser know that a particular resource will be needed soon so it can start loading it.
You’d set that up by installing: npm install --save-dev preload-webpack-plugin html-webpack-plugin and then adding that to your Webpack config:
const PreloadWebpackPlugin = require('preload-webpack-plugin');
const HtmlWebpackPlugin = require('html-webpack-plugin')

plugins: [
  new HtmlWebpackPlugin(),
  new PreloadWebpackPlugin({
    rel: 'preload',
    include: 'asyncChunks'
  })
]
That’s it! Now all our async chunks will be added to our HTML and preloaded like this:
<link rel="preload" as="script" href="chunk.31132ae6680e598f8879.js">
<link rel="preload" as="script" href="chunk.d15e7fdfc91b34bb78c4.js">
<link rel="preload" as="script" href="chunk.acd07bf4b982963ba814.js">
As of Webpack 4.6+, this comes built in where you can manually specify which dependencies you want to preload or prefetch using inline import directives which Webpack will automatically output as resource hits without the need to install the plugins I mentioned above.
So all you’d need to change in the import statements from above:
import("foo");
import("bar")
would be this:
import(/* webpackPrefetch: true */ "foo");
import(/* webpackPreload: true */ "bar")
So it comes down to a matter of preference, whether you want to manage your preload preference from the config file for the entire project using the preload plugin or if it’s something you want to leave up to individual developers and let them decide which dependencies should be preloaded/prefetched in which case no need to install anything special.
Lastly, you’ll want to carefully consider if you want to use prefetch or preload. It will depend on the resource and the application context. I’ll point you to this excellent write-up by Addy Osmani to understand the subtle differences between the two. But as a general rule:
Preload resources you have high-confidence will be used in the current page. Prefetch resources likely to be used for future navigations across multiple navigation boundaries.
Analyzers
Now that we’ve looked at some ways at optimizing our Webpack setup, we’ll want to keep an eye on the bundle as we add more code and dependencies to make sure it’s still at its optimal state. My two favorite tools for doing that are:

You’d set that up by installing: npm install --save-dev webpack-bundle-analyzer and then adding that to your Webpack config:
const BundleAnalyzerPlugin = require('webpack-bundle-analyzer').BundleAnalyzerPlugin;

if (process.env.NODE_ENV !== 'production') {
  config.plugins.push(new BundleAnalyzerPlugin())
}
Next time when you start the webpack-dev-server in development mode, you can navigate to http://localhost:8888 to see the bundle visualization like above

This is my second favorite tool, it presents the same information as Webpack Bundle Analyzer but in a slightly different way in addition to providing a way to monitor bundle history over time.
You’d set that up by installing: npm install --save-dev webpack-monitor and then adding that to your Webpack config:
const WebpackMonitor = require('webpack-monitor');

// ...

plugins: [
  new WebpackMonitor({
    capture: true, // -> default 'true'
    target: '../monitor/myStatsStore.json', // default -> '../monitor/stats.json'
    launch: true, // -> default 'false'
    port: 3030, // default -> 8081
    excludeSourceMaps: true // default 'true'
  }),
],
You could run this in development like the previous plugin or maybe also run this for production builds and export the output somewhere to so you can analyze how your production bundle has changed over time.
Conclusion
That’s all folks! Hopefully, with all these techniques you are able to significantly cut the bundle size and improve performance. Let me know how it goes. Are there any other techniques that I missed? Leave a comment below!