Recently I was working on querying an API that didn’t have a Ruby SDK. So I had the opportunity to write a thin service wrapper for it. This API allowed requesting a specific page and the total number of records to include per page.
So say for example, the API returned a list of people. Here’s what that would look like:
I made a first attempt at writing a PeopleService PORO that is responsible for querying those records:
classPeopleServicedefwhere(params={})default_params={page: 1,count: 25}params=default_params.merge(params)make_request(params)endprivatedefmake_request(params)# Make external API call using the paramsendend
That would do the job if the caller writes their our own iteration logic. For instance, if we want to retrieve all the People from the API:
Although that feels a bit messy. The API contract is leaking out of the PeopleService abstraction layer that we just created.
Let’s make it Rails-y
I want my service object to follow more Rails like conventions. So in other words, I’d like to be able to iterate over the results from the PeopleService in an ActiveRecord like syntax. For example: PeopleService.new.all.each{ |person| #some operation }
Enumeration
So to achieve that, we will have to make use Ruby’s Enumerator object:
classPeopleServicedefinitialize# Setup API auth paramsenddefwhere(params={})default_params={page: 1,count: 25}params=default_params.merge(params)make_request(params)enddefall(params={})Enumerator.newdo|yielder|page=1loopdoresult=where(params.merge(page: key))result[:items].map{|item|yielder<<item}# This loop knows how to rescues from this exception and will treat it as a break raiseStopIterationifpage>=result.dig(:meta,:page,:total).to_ipage+=1endend.lazyendprivatedefmake_request(params)# Make external API call using the paramsendend
That will get us closer to what we are looking for. Using the Enumerator object above is what will give us the ability to iterate over the results returned from the all method. It will instantiate and return an Enumerable object.
That will unlock a powerful ability to chain a number of enumerators together and perform block operations on them which will make our service highly composable.
So for example, if we wanted to group the people by their location we could chain the results with a group_by function:
Lastly, you might have noticed we tacked in a .lazy at the end of the enumerable instance. What that does is makes it into an instance of Enumerator::Lazy and only returns the results that we specifically enumerate over.
So say if this API had 1,000 pages of results. Without the lazy enumerator, PeopleService.new.all would actually query all of those 1,000 pages as soon as you call it. That would be extremely slow and resource-intensive. In most cases, we might even hit a rate limit set by the API provider. What we rather want is that it only query the pages that we actually enumerate over.
So for example, if we are trying to find the person object with a specific email, it will stop querying the API as soon as it finds a page that contains Jon Doe:
Right now calling the all method again, despite it being a lazy enumerator will query the pages it has already queried. So for example:
ps=PeopleService.new# This will iterate through the pages until we find Jon Doeperson=ps.all.find{|person|person.email='[email protected]'}# Calling this again **should not** query the same pages again. We should already store the results.person=ps.all.find{|person|person.email='[email protected]'}
Similar to ActiveRecord’s query cache, we also want to cache the results from our query for performance. This is where one of the most underrated features of the Hash class comes into play.
If you instantiate a Hash with a block, it will use that block to calculate the value of the key. In our case, we can tell the hash to call the API to fetch the results of the page we are looking for.
The beauty of this feature is that it will only call the block once per key. So if the key has already been assigned a value, it will not call it again:
h=Hash.newdo|h,key|h[key]=where(page: key)endh[1]# Fetches results for page 1 fromt he API# => (500.0ms) [{...},{...},{...}]# Next call to the same key is already assigned, the block isn't executedh[1]# => (Cached 0.0ms) [{...},{...},{...}]
When using the Hash approach in our class, we will also want to make sure that we use Memoization (using the ||= operator) to ensure that the Hash itself is cached in an instance variable called all_pages.
This will allow us to call the all method multiple times after the class has instantiated and ensure the results don’t get overwritten:
Here’s what our finished product looks like after leveraging the key features of the Enumerator and Hash objects. Now our all method’s interface will be very similar to the one provided by ActiveRecord
classPeopleServicedefwhere(params={})default_params={page: 1,count: 25}params=default_params.merge(params)make_request(params)enddefall(params={})Enumerator.newdo|yielder|page=1loopdo@all_pages||=Hash.newdo|h,key|h[key]=where(params.merge(page: key))endresult=@all_pages[page]result[:items].map{|item|yielder<<item}raiseStopIterationifpage>=result.dig(:meta,:page,:total).to_ipage+=1endend.lazyendprivatedefmake_request(params)# Make external API call using the paramsendend
Usage:
ps=PeopleService.newps.all.eachdo|person|# some operation on the person objectend
Let me know if that was useful. Would love to hear about any other techniques that you’ve found particularly interesting when querying external APIs.
So a few weeks ago I stumbled upon something that reminded me of Arthur C. Clarke’s famous 3rd law — Any sufficiently advanced technology is indistinguishable from magic.
It was something I’d never seen before. It was a moment where I saw a piece of complex technology becoming easily accessible and approachable to a much larger group.
Of course, I’m talking about OpenAI’s Generative Pretrained Transformer 3 or commonly known as GPT-3. OpenAI announced that they are opening up access to it through their API which is invite-only at this point.
So far I’ve seen it described as the biggest thing since the Internet, the Blockchain, and everything in between. It intrigued me to no end and I wanted to learn more. That made me go down a bit of a rabbit hole. Here’s my attempt to summarize my findings from a layman perspective.
Show me the Magic!
Before we understand what’s under the hood, let’s see this in action.
Search Engine
Here’s a demo where GPT-3 acts as a search engine that can reply with an answer to your exact query
I made a fully functioning search engine on top of GPT3.
For any arbitrary query, it returns the exact answer AND the corresponding URL.
Look at the entire video. It's MIND BLOWINGLY good.
So you get the idea! The only limit is your imagination. So now let’s see what’s behind the curtain.
What sorcery is this?!
So the simplest way to describe what you saw in those demos would be that a computer program was fed a huge chunk of human knowledge. A user would then give it an example or two of a question-answer pair and then proceed to ask similar questions to which it will respond with accurate answers. That’s really the gist of what we are seeing in the demos.
Now let’s get a bit jargony and break that down a bit. So what is it technically? It’s an unsupervised transformer language model that contains 175 billion parameters capable of few-shot learning. Whoa okay, that sounds impressive. But what does it all mean?
First, what is a language model?
It’s a program that knows the relationships between words in a language. It knows the probability of words and sentences that should appear after another. This forms the foundation of voice recognition tech like Alexa, Siri, etc
Again, summarizing the concept in the simplest way possible. The type of language model tells us how it was trained i.e how did it come up with the relationship between words and sentences in a language. In other words, it tells us how those probabilities were calculated.
Traditionally models built on the LSTM (Long short-term memory) or CNN (Convolutional neural network) have been used but they had some significant disadvantages. First, the relationship between words and sentences would be lost the farther apart they were. Second, the processing of those sentences had to be done sequentially word-by-word which meant it was slow.
Transformer, on the other hand, is a novel architecture that was introduced in a paper titled Attention Is All You. It solved both of those challenges based on the concept of “attention” which let the model directly look at, and draw from, the state at an earlier point in the sentence.
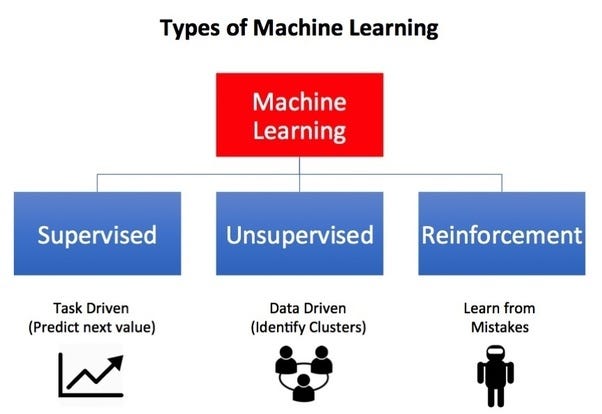
Unsupervised learning is one of the three main types of machine learning models that include supervised and reinforcement learning.
What makes it different from the other two is the fact that it doesn’t need a structured and labeled dataset nor is the algorithm incentivized for certain types of outcomes over others like for example in a game.
GPT-3 model was given a large dataset consisting of sources such as Common Crawl, Wikipedia, WebText, Books among others worth around 45 TB of text.
When that data was analyzed, simply put, the model was able to extract 175 billion different characteristics about the dataset and establish relationships between them.
According to Geoffrey Hinton — the godfather of ‘deep learning’ — parameter can be thought of as a synapse in a human brain:
My belief is that we’re not going to get human-level abilities until we have systems that have the same number of parameters in them as the brain. So in the brain, you have connections between the neurons called synapses, and they can change. All your knowledge is stored in those synapses. You have about 1,000-trillion synapses—10 to the 15, it’s a very big number. So that’s quite unlike the neural networks we have right now. They’re far, far smaller, the biggest ones we have right now have about a billion synapses. That’s about a million times smaller than the brain.
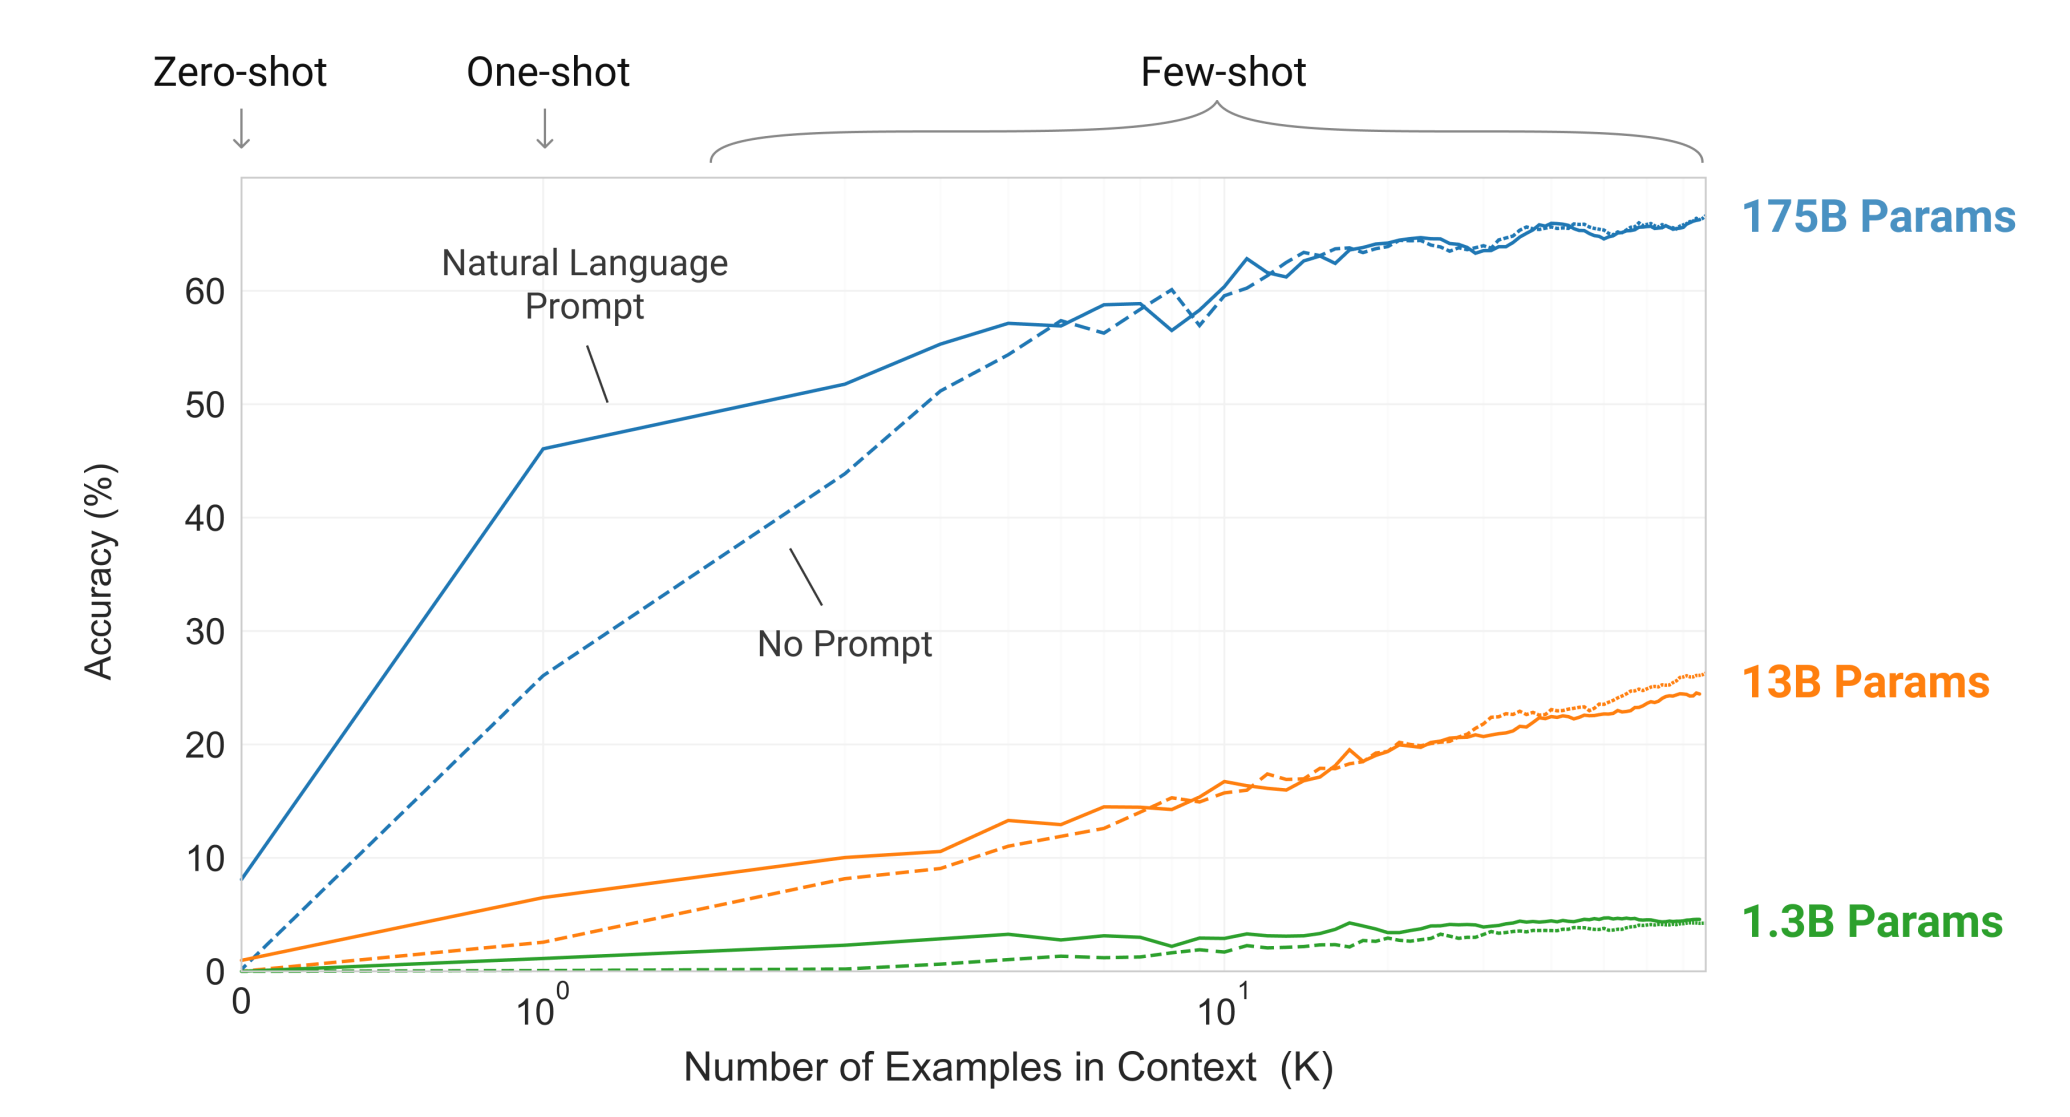
Lastly, what is few-shot learning?
In a paper titled Language Models are Few-Shot Learners researchers demonstrated that language models that have a large number of parameters like GPT-3 excel in performance even when it’s provided with very few examples of the kind of results we are expecting from it. So in other words, the more parameters it has, fewer the examples you have to provide to achieve accuracy:
Not everything that glitters is gold
Will numerous professions be put out of work? Will Skynet take over? Nope, not even close. GPT-3 while very impressive and seemingly magical has several flaws.
Data Quality & Bias
Given this model is trained on a large corpus of data on the internet, it also contains all the unpleasant things that come with it. For example, here are some instances of inherent biases and downright racist/sexist outputs:
#gpt3 is surprising and creative but it’s also unsafe due to harmful biases. Prompted to write tweets from one word - Jews, black, women, holocaust - it came up with these (https://t.co/G5POcerE1h). We need more progress on #ResponsibleAI before putting NLG models in production. pic.twitter.com/FAscgUr5Hh
— Prof. Anima Anandkumar (@AnimaAnandkumar) June 11, 2020
This is no secret and OpenAI themselves warn about it in their FAQs:
How will OpenAI mitigate harmful bias and other negative effects of models served by the API?
Mitigating negative effects such as harmful bias is a hard, industry-wide issue that is extremely important. Ultimately, our API models do exhibit biases (as shown in the GPT-3 paper) that will appear on occasion in generated text. Our API models could also cause harm in ways that we haven’t thought of yet.
Priming
So a lot depends on the quality of inputs or examples you feed GPT-3 which is called “priming”. If you prime poorly, you’ll get poor results. Since the model is trained on a massive dataset, chances are, if you give it carefully curated inputs, it will likely return intelligent outputs. How well you prime this model becomes the special sauce.
Lack of competitive advantage
That brings me to my next point. Priming is the only special sauce, otherwise, everyone has access to the same model. So whatever products you build, could theoretically be easily reproducible by competitors.
3rd party models like GPT-3 can only be a value-add on top of whatever you are offering, it can’t be THE product otherwise you will quickly go out of business. This is the reason a lot of companies will continue to train custom models on private/proprietary data and hyper optimize it for the use-case they are trying to solve. That will continue to be the way forward for any serious business applications.
This may very well change in the future as their API evolves and becomes more feature-rich. Capability to fine-tune this model would almost certainly be on their roadmap to make this appealing for any serious applications.
API Limitations / Cost
Speaking of API, we still have no idea how this API will function in a production setting. What would the latency look like? What will be the associated costs? Will there be any rate limiting/throttling? What about SLA / uptime guarantees? What about data privacy and ownership of inputs and outputs?
Where do we go from here?
While there are several limitations and challenges, OpenAI has shown us what could be possible in the future.
Remember the time the iPhone was launched? Before then Moto Razr was the hottest phone to have. The phone market was slowly but incrementally making improvements. But the iPhone completely turned the market upside down. It beautifully merged some of the advancements in hardware and software up until then into one product and made it accessible to a broader market like nobody had done before.
OpenAI’s API might just be an inflection point like that. It democratizes access to AI so that a much broader group of users can easily leverage it and build applications on top of it. It has the potential to be the AWS of modeling if they add more capabilities and build a rich ecosystem.
In the coming years, we can only expect the newer iterations of this model to get more and more powerful. After all, this is only the first step in OpenAI’s mission to achieve artificial general intelligence (AGI). An AI so powerful it can understand or learn any task that a human being can — something which is deeply exciting and terrifying at the same time.
With the latest major Webpack release (version 4.x), we are at a point where you don’t need a config to get started. It is optimized by default (#0CJS!). So plugins that had to be manually added and configured like CommonsChunkPlugin,UglifyjsWebpackPlugin, etc are automatically instantiated by Webpack under the hood which makes life easier!
Although there are a few things we can still do to make sure we are getting the most out of Webpack. Let’s go through them one by one.
Mode
Webpack 4 comes with two modes: production and development. Running webpack with the flag --mode development|production or setting that in the config file enables bunch of optimizations by default:
Option
Description
development
Provides process.env.NODE_ENV with value development. Enables NamedChunksPlugin and NamedModulesPlugin.
production
Provides process.env.NODE_ENV with value production. Enables FlagDependencyUsagePlugin, FlagIncludedChunksPlugin, ModuleConcatenationPlugin, NoEmitOnErrorsPlugin, OccurrenceOrderPlugin, SideEffectsFlagPlugin and UglifyJsPlugin.
So no need to manually include those plugins or set the NODE_ENV using the DefinePlugin, that’s all taken care of when using mode.
By the way, if you still want to pass custom params to the UglifyJsPlugin, which I found myself wanting to, you can do so by installing it: npm install uglifyjs-webpack-plugin --save-dev and then specifying your custom params in the Webpack config:
That will basically override Webpack’s default minimizer instance with your own so you have full control over it.
That config will make sure uglifier runs in parallel mode, caches output to reuse in the next build, generates source maps and suppresses comments in the console when running in production mode. You can find the full list of available options here.
Hashes
By default, Webpack will not add cache busting hashes to the output filenames (eg, index.7eeea311f7235e3b9a17.js). So your users might not get the latest code the next time you do a release which could result in a lot of strange behavior and bugs.
So in order to refresh your assets after every build, you can add the hash in the filename:
Although if you think about it, that seems a bit heavy-handed. What if there are no changes in your vendor.js, it would be nice if Webpack was smart and only updated the hash of chunks that have changed. That way the client doesn’t have to download all the assets again every time we push out a new build even if nothing has changed.
In order to ensure that happens, Webpack provides chunkhash. Chunkhash is based on the contents of each entry point rather than the entire build. Using that is just as easy:
This will make sure we are getting the best of both worlds. When a new release goes out, the client will fetch the updated files while still using the cached version of the files that haven’t changed.
Babel
Transpiling
Since not every browser supports ES6/7/Next features, navigating what would work and wouldn’t on browsers quickly becomes a minefield:
So that’s where Babel comes in. It provides some amazing plugins that make writing modern JavaScript a breeze by transpiling (converting) modern JS into something that will work on every browser we specify.
You’d set that up by installing: npm install babel-core babel-loader babel-preset-env --save-dev
Now you can tell Babel which browsers we want to target in plain English (using browserslist syntax) in .babelrc at the root of your project folder:
Now you can use all the latest JavaScript syntax worry-free as Babel will take care of browser compatibility.
Dynamic imports
So the next advantage of using Babel is performance related. We can use it’s dynamic import plugin to load large dependencies asynchronously only when you need them aka lazy loading. This can make a dramatic impact on the size of your entry point file since Webpack doesn’t have to load the entire dependency tree at once.
You’d set that up by installing: npm install syntax-dynamic-import --save-dev and then adding that to your .babelrc
importfoofrom'foo'importbarfrom'bar'importbazfrom'baz'constmyfun=()=>{//Do something with the modules here }
can be converted to this:
constmyfun=()=>{returnPromise.all([import('foo'),import('bar'),import('baz'),]).then(([foo,bar,baz])=>{//Do something with the modules here });};
Webpack will recognize those dynamic imports and code split those into separate chunks. They will be loaded async once myfun is called at runtime. This will make sure our initial chunk size remains small and the client doesn’t have to download resources that it may not even need.
Side note, if you are using Vue this is supported out of the box with Async Components but of course, if you are dealing with a large app with various frameworks that alone will not suffice so you will need a generic solution like this.
Preload
Now that we have optimal code-splitting, one downside is that the client still has to load those dependencies at runtime potentially slowing down the responsiveness of your app. So in the example above, when we call myfun, the client first has to load foo, bar and baz before it can execute the function.
What if we could preload those dependencies in the background so by the time we call myfun those dependencies are already available and ready to go? That’s where the preload plugin comes in.
It uses the Preload web standard to declaratively let the browser know that a particular resource will be needed soon so it can start loading it.
You’d set that up by installing: npm install --save-dev preload-webpack-plugin html-webpack-plugin and then adding that to your Webpack config:
As of Webpack 4.6+, this comes built in where you can manually specify which dependencies you want to preload or prefetch using inline import directives which Webpack will automatically output as resource hits without the need to install the plugins I mentioned above.
So all you’d need to change in the import statements from above:
So it comes down to a matter of preference, whether you want to manage your preload preference from the config file for the entire project using the preload plugin or if it’s something you want to leave up to individual developers and let them decide which dependencies should be preloaded/prefetched in which case no need to install anything special.
Lastly, you’ll want to carefully consider if you want to use prefetch or preload. It will depend on the resource and the application context. I’ll point you to this excellent write-up by Addy Osmani to understand the subtle differences between the two. But as a general rule:
Preload resources you have high-confidence will be used in the current
page. Prefetch resources likely to be used for future navigations
across multiple navigation boundaries.
Analyzers
Now that we’ve looked at some ways at optimizing our Webpack setup, we’ll want to keep an eye on the bundle as we add more code and dependencies to make sure it’s still at its optimal state. My two favorite tools for doing that are:
Next time when you start the webpack-dev-server in development mode, you can navigate to http://localhost:8888 to see the bundle visualization like above
This is my second favorite tool, it presents the same information as Webpack Bundle Analyzer but in a slightly different way in addition to providing a way to monitor bundle history over time.
You’d set that up by installing: npm install --save-dev webpack-monitor and then adding that to your Webpack config:
You could run this in development like the previous plugin or maybe also run this for production builds and export the output somewhere to so you can analyze how your production bundle has changed over time.
Conclusion
That’s all folks! Hopefully, with all these techniques you are able to significantly cut the bundle size and improve performance. Let me know how it goes. Are there any other techniques that I missed? Leave a comment below!
While Ethereum has been the platform of choice for writing dApps, Stellar arguably has really low transaction fees and is much faster than other blockchains (including Ethereum).
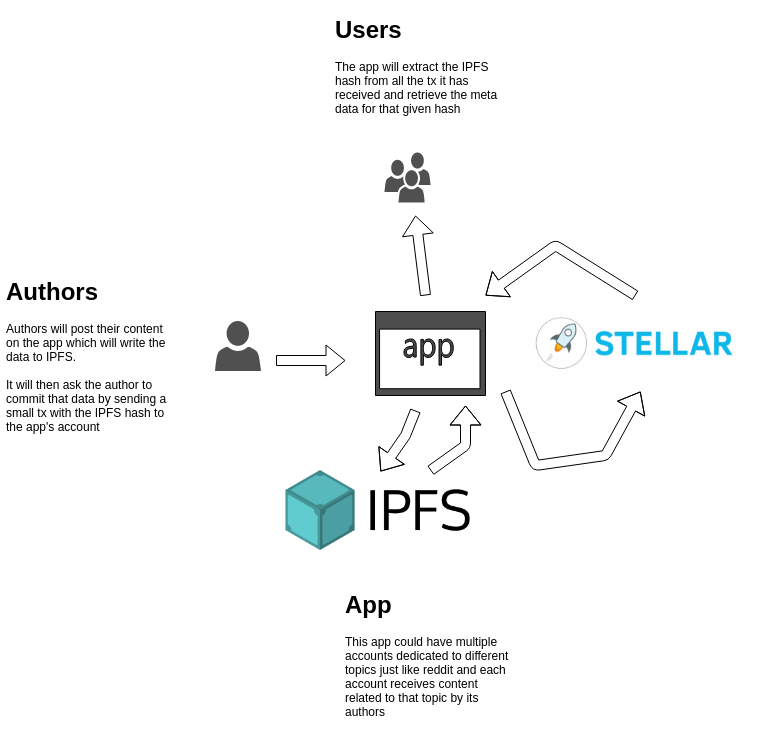
So I began to wonder what it would look like to actually build a decentralized version of a forum like HackerNews or Reddit using the Stellar blockchain. Here’s the big picture of how I envisioned it to work:
Let’s see how we would go about implementing that.
First, we need to create an account on the Stellar testnet. What’s a testnet? In the simplest terms, it’s a blockchain intended for testing where you don’t incur any real fees. In this case, we’ll load up our test account with 10k fake lumens for testing.
Next, we will build a small JavsScript client which will allow the user to submit their post on the app.
We could directly take this post and have the user send it to our app’s account by putting it in the transaction’s memo field. Although it turns out Stellar’s transaction only allows limited memo formats - Text (UTF-8 string of up to 28 bytes), ID (Unsigned 64-bit integer) or Hash (32-byte hash in hex format). So storing a large amount of text or JSON is out of the question.
Send it to IPFS
That’s where IPFS comes in - a P2P protocol and network designed to store and share content in a distributed file system across all devices (think of it as a love child of git and BitTorrent).
We would take that data and store it in a JSON object in the IPFS.
importipfsAPIfrom'ipfs-api'// I'm just using an IPFS gateway here for testing but in a real-world setting, we would run our own IPFS node so we can persist dataconstipfs=ipfsAPI({host:'ipfs.infura.io',port:5001,protocol:'https'});constpost=JSON.stringify({title:'So exited!!!',content:'This is my first post on the blockchain!',username:'h4ck3r'})constbuffer=Buffer.from(post);ipfs.files.add(buffer,{pin:false},(err,ipfsHash)=>{console.log(ipfsHash[0].path)// => QmV3C3HFE8824KWYTMq5fbZyF93GTMz5W7h3uBG1oVZCv8});
Now we have a hash small enough to send in the memo field. Although looks like there might be another issue. IPFS represents the hash of files and objects using a Multihashmultiformat with Base58 encoding. The prefix Qm corresponds to the algorithm (SHA-256) and length (32 bytes) used by IPFS.
So it looks like we are not going to be able to add this in our transaction’s Text field which only allows strings of up to 28 bytes nor are we able to use the Hash field which only allows 32-byte hash.
So we’ll have to write a function that converts this IPFS hash back to 32 byte hash in hex format:
importbs58from'bs58'this.getBytes32FromIpfsHash=(ipfsListing)=>{// Decode the base58 string and then slice the first two bytes// which represent the function code and it's length, in this case:// function:0x12=sha2, size:0x20=256 bitsreturnbs58.decode(ipfsListing).slice(2).toString('hex')}
Add it on the Blockchain
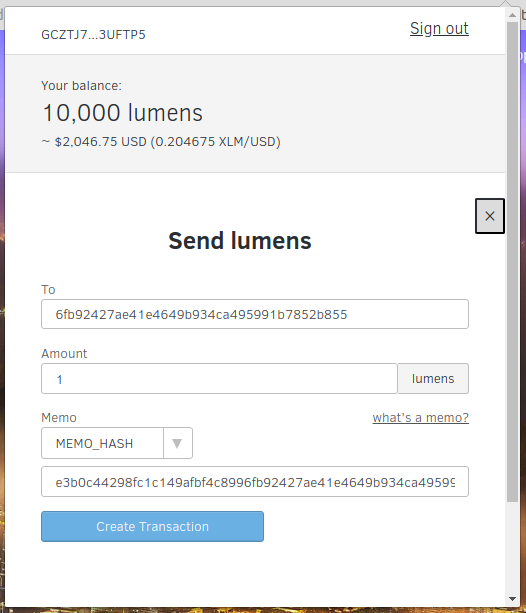
Now that we have the right hash to store in the memo field, we’ll have to figure out how to actually send this transaction. One option is to prompt the user to make use of MetaPay which is a Chrome extension wallet for Stellar (kind of like MetaMask for Stellar Lumens). Once they have MetaPay installed, we can just setup a URL like this:
Now if we put it all together, the submit post logic would look something like this:
importStellarSdkfrom'stellar-sdk'// Add the post data to IPFSthis.submitPost=(post)=>{constbuffer=Buffer.from(post);ipfs.files.add(buffer,(err,ipfsHash)=>{this.txMemo=this.getBytes32FromIpfsHash(ipfsHash[0].path)this.refs['savePost'].click()// This will open the MetaPay popupthis.confirmPayment(this.txMemo)// Listen to see if the transaction went through});}// Check to see if the transaction went throughthis.confirmPayment=(ipfsHash)=>{constserver=newStellarSdk.Server('https://horizon-testnet.stellar.org');server.transactions().forAccount('OUR_ACCOUNT_ID').cursor('now').stream({onmessage:(transaction)=>{if(transaction.memo==ipfsHash){// Yes, it made it on the blockchain!transaction.operations().then((ops)=>{varpayment=ops._embedded.records[0];if(parseInt(parseFloat(payment.amount))<1){console.error('Payment insufficient. Post not saved!');}else{this.pinIpfsListing(ipfsHash);}}).catch((error)=>{error.target.close();// Close streamconsole.error('Payment Error: ',error);alert('Error confirming payment. Try again later');});}},onerror:(error)=>{error.target.close();// Close streamconsole.error('Streaming Error: ',error);}});}
That will open the MetaPay popup with all the prefilled fields, we will wait and see if the user goes through with that transaction, if they do, we move to the next step.
Persist it on IPFS
// If successful, pin our post on the IPFS nodethis.pinIpfsListing=(ipfsHash)=>{ipfs.pin.add(ipfsHash)}
Notice when we added our data to IPFS, we didn’t pin it. Without pinning the post, our data will not be stored permanently on the IPFS node and will eventually be garbage collected.
So in a way that small transaction fee helps us pay for pinning the data / the cost of running an IPFS node and make sure the data is available for all users.
Read from the Blockchain & find it on IPFS
Now when other users visit the app, we will pull all the transactions posted to this app’s account, grab the memo field, encode it back to Base58 and pull the data from IPFS:
importStellarSdkfrom'stellar-sdk'importipfsAPIfrom'ipfs-api'this.getIpfsHashFromBytes32=(bytes32Hex)=>{// Add our default ipfs values for first 2 bytes:// function:0x12=sha2, size:0x20=256 bitsconsthashHex="1220"+bytes32HexconsthashBytes=Buffer.from(hashHex,'hex');consthashStr=bs58.encode(hashBytes)returnhashStr}constserver=newStellarSdk.Server('https://horizon-testnet.stellar.org');constipfs=ipfsAPI({host:'ipfs.infura.io',port:5001,protocol:'https'});letposts=[];server.transactions().forAccount('OUR_ACCOUNT_ID').order('desc').call().then((page)=>{page.records.forEach(record=>{if(record.memo){constipfsListing=this.getIpfsHashFromBytes32(record.memo)ipfs.files.get(ipfsListing,function(err,files){files.forEach((file)=>{constpost=file.content.toString('utf8')posts.push(post)// Show this to the user})})}});});
Decentralization
This architecture makes sure our data is decentralized but what about the app itself? If the app goes down, users could write another client that can read from that account’s blockchain and pull the corresponding data from IPFS.
Although we could go one step further and actually store the client code on the blockchain as well by utilizing the manageData account operation.
Something like this could be part of the build / deploy chain for the app, so everytime a new version is released, it’s also added to the blockchain:
Although something to keep in mind, each DataEntry increases the minimum balance needed to be held by the account. So we might want to only maintain the last version or the last couple of versions of the client codebase on the account. But that should suffice to make our demo app more or less decentralized.
Conclusion
This was an interesting thought experiment but this demo app still does not have a way to manage comments, upvotes, etc since we are somewhat limited by what the Stellar platform is capable of.
To build something more advanced we’d need to build it on a true dApp platform like Ethereum or NEO that have all the necessary tooling to make that happen.
But with the recent controversy of Facebook data and user privacy, it’s definitely time to think about how to build social apps that are decentralized.
There’s a lot of interesting work done in this space with projects like Datawallet, Blockstack, Akasha and others which will be interesting to follow in the coming years.
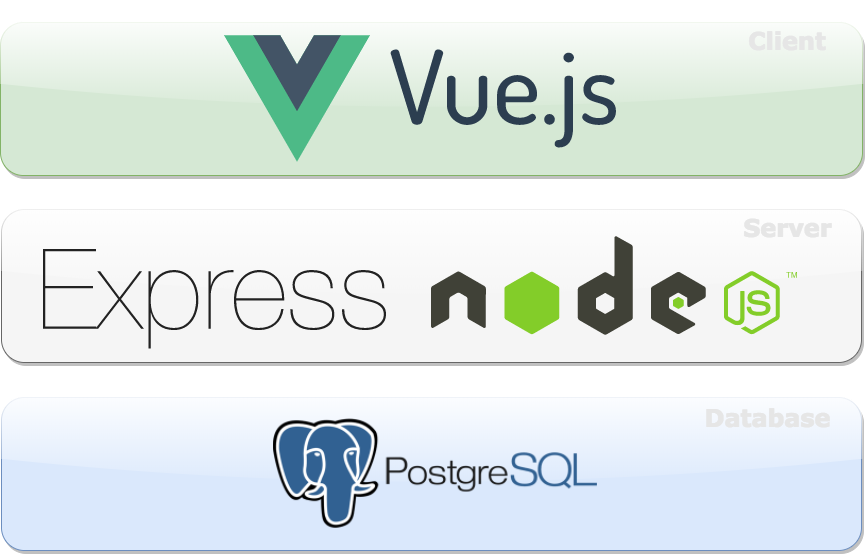
We have all heard of the MEAN (MongoDB Express Angular NodeJS) stack or more lately the MERN (MongoDB Express React and NodeJS) stack.
There are plenty of starter kits utilizing those stacks although I was looking for something similar but with a couple of changes. I wanted to switch out MongoDB with PostgresSQL because it’s a workhorse that can do just about anything and switch out React with VueJS because I find Vue much more approachable and beginner friendly.
I didn’t find anything like that out there, so I ended up creating one myself. Lets call it the PEVN (PostgreSQL Express VueJS NodeJS) stack, I know…0 for creativity!
I spent couple of hours getting everything working like how I wanted it to. I documented the process to save the trouble for anyone looking to do the same which you’ll find below.
Before we can get started, let’s make sure we have NodeJS installed. I’ve found the easiest way to do so is via nvm. Rails developers will find this very similar to rvm. To install, run the following commands which will install nvm and the latest version of NodeJS:
Now that we have a basic app, let’s get to the fun part. We will treat each Express view as it’s own VueJS app (MVVM pattern) which will grab the data it needs from the DOM and/or making AJAX requests to the server.
So for this example, given we have views/index.jade we will want to place it’s associated VueJS app and styles in client/css/index.css, client/js/index.js and /client/js/Index.vue such that when that Jade view is rendered, it will run the Index Vue app.
So we’ll have to tell our view in views/index.jade to load our packaged asset file:
Our client/js/index.js will bootstrap our Index Vue app:
importVuefrom'vue'importIndexfrom'./Index.vue'newVue({el:'#index',data:{visitors:[]},render(createElement){returncreateElement(Index)},beforeMount(){this.visitors=JSON.parse(this.$el.dataset.visitorsJson)//Grab this data from the DOM}})
Our Vue app lives in client/js/Index.vue:
<template><div><h1>Hello World</h1><p>Welcome to PostgreSQL, Express, VueJS, NodeJS starter</p><p>Here are the last 10 visitors:</p><table><thead><th>ID</th><th>IP</th><th>User Agent</th></thead><trv-for="(visitor, index) in visitors":key="index"><td></td><td></td><td></td></tr></table></div></template><script>exportdefault{data(){return{visitors:[]}},methods:{},created(){this.visitors=this.$parent.visitors;//Grab this data from the parent}}</script>
Don’t worry about the logic to display the list of visitors just yet. We’ll get to that in a minute.
Webpack
In order to create a packaged index.js asset file for our view, we will need to install Webpack, VueJS and its associated dependencies:
Our Webpack config will make sure the assets in the client folder get compiled into a compressed JS and CSS package with a cache busting hash filename.
Now we will have to let Express know that we are using Webpack and that we want to run it during start-up. So in the app.js add the following:
For the purpose of this example, we will just create a Visitors table which will log the user’s IP and UserAgent string every time you visit the home page and spit out the last 10 records:
varexpress=require('express');varmodels=require('../models');varrouter=express.Router();/* GET home page. */router.get('/',function(req,res,next){models.Visitor.create({user_agent:req.get('User-Agent'),ip:req.ip,}).then(()=>{models.Visitor.findAll({limit:10,order:[['createdAt','DESC']]}).then((visitors)=>{res.render('index',{title:'PEVN Stack!',visitors:visitors});})});});module.exports=router;
Conclusion
With that we come full circle and close the loop. If everything worked, you should now be able to run your app on port 4000 with:
$ npm start
One thing you might notice is that the app will require a restart everytime you change the server code which can get pretty annoying. We can switch to using nodemon instead so the app can restart automatically when the code changes:
$ npm install--save-dev nodemon
In our nodemon.json we can configure it to restart when it detects changes to our server side logic:
{"verbose":true,"ignore":["public/"],"events":{"restart":"osascript -e 'display notification \"App restarted due to:\n'$FILENAME'\" with title \"nodemon\"'"},"watch":["routes/"],"env":{"NODE_ENV":"development"},"ext":"js jade"}
Lastly we can update our npm start command to be nodemon app.js
There are a few more interesting things we could do which I left out for this quick start. Like for example, we could run our NodeJS server logic through Babel so we can use ES6 syntax on the server as well. I’ll look forward to pull requests for those kind of enhancements from the community! :)