29 Jul 2023
A Step-by-Step Sprint Planning Guide for Engineering Leaders
 Sprint Planning Meeting from Classic Programmer Paintings
If you’ve been an engineer for some amount of time in the tech industry, you have probably experienced the highs and lows of sprint planning meetings. Maybe it has felt a bit like this painting by Marie Bashkirtseff. I’ve personally been in the trenches, both as a participant and as a leader, and have witnessed the wide array of approaches and their varying levels of effectiveness. It became apparent to me that the success of sprint planning lies in finding a structured and efficient approach that aligns the team and maximizes productivity.
Sprint planning is the backbone of Scrum-based agile project management, providing the framework for teams to organize their work and establish clear goals for each iteration. Yet, all too often, I’ve seen these meetings devolve into chaos, resulting in misaligned priorities and a waste of valuable time. Recognizing the need for a better way, I embarked on a journey to refine and iterate upon a process that consistently delivers exceptional results.
Through countless iterations and learnings, I’ve developed a process that has significantly improved the effectiveness of sprint planning while keeping the meeting overhead low. This process has helped my teams regain focus, enhance collaboration, and achieve remarkable outcomes.
In this article, I aim to share my insights and provide you with a step-by-step guide to streamline your own sprint planning, ensuring that it becomes a powerful tool for success.
Principles
Before we go any further, I will state this is an opinionated view on sprint planning and it follows these four underlying principles:
- Bulk of the sprint planning happens 2 weeks leading up to the sprint start: Allotting adequate time for gathering requirements, aligning priorities, and preparing for the upcoming work is vital. This two-week timeframe allows for thorough preparation and sets the stage for a successful sprint.
- Sprint planning session is mainly for high-level sprint review and alignment: The sprint planning session itself should primarily focus on reviewing the high-level aspects of the upcoming sprint and ensuring alignment with the team’s goals. Detailed discussions and refinement of tasks should occur prior to the planning session.
- Each team member is an owner and driver of their work stream: Engineers are not “ticket takers” but leaders who take responsibility for problem definition and own end-to-end execution. Consequently, each team member is responsible for creating tickets and breaking down work into manageable chunks, ensuring a proactive and self-driven approach.
- Tickets in the sprint are conscious commitments to deliver: The team takes a proactive and accountable approach to managing workload. Promptly flag any potential delays, emergent work, or setbacks and involve the stakeholders to renegotiate commitments in alignment with the evolving circumstances. It’s crucial to avoid scope creep during the sprint. If new tasks or requirements emerge mid-sprint, renegotiate commitments for existing work rather than merely piling new tasks on top.
Prerequisites
Before diving into the tactical sprint planning process, there are a few prerequisites that need to be in place:
- Long-term roadmap for your team: Having a clear vision of your team’s long-term goals and initiatives is essential. This roadmap will serve as a guide for prioritizing work during sprint planning, ensuring that each sprint contributes to the broader objectives. If you don’t have this, at minimum having OKRs is important so that everyone is aligned at a high level on how the day-to-day work ladders up to more overarching business (or mission) objectives.
- JIRA plan of Epics: Use a project management tool like JIRA to create a plan and map out Epics based on your long-term roadmap. Breaking down large-scale goals into actionable initiatives upfront facilitates better planning and execution.
- High-level visual roadmap: Develop a low-fidelity visual roadmap that outlines drivers & their work streams per sprint for the entire quarter. Fill out as much as you have clarity on upfront. Keep this updated as the rest of the quarter progresses with the goal of having a light of sight at least 1–2 sprints out. This holistic view of the work to be accomplished provides clarity and alignment for the rest of the team and an easy-to-consume visual for stakeholders outside the team.
 Here’s an example of a high-level visual roadmap using Confluence Roadmap Planner
Tactical Steps
Now, let’s dive into the tactical steps to streamline your sprint planning process:
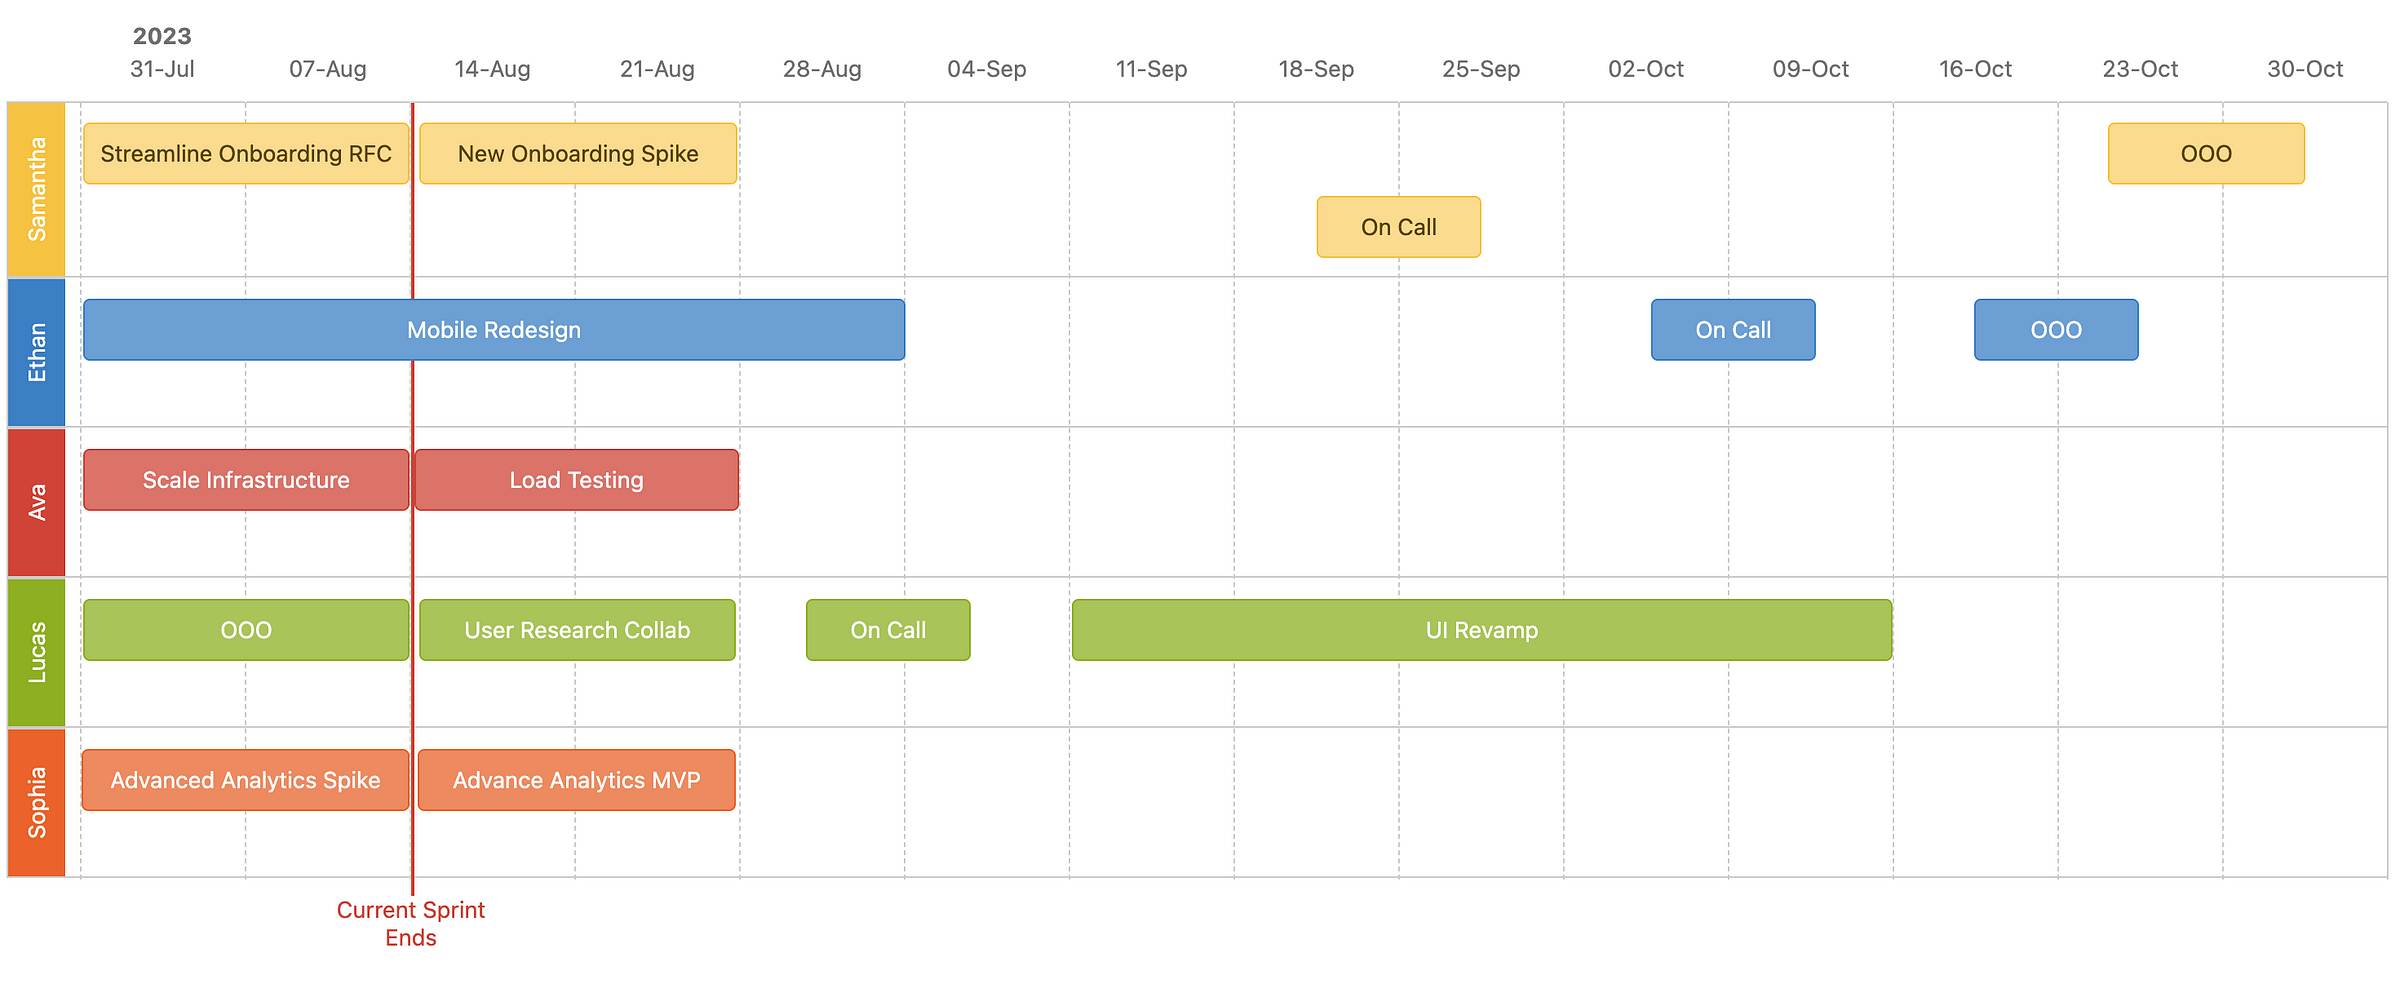
 What a typical schedule of ceremonies looks like for my teams
Part 1: Two weeks prior to the sprint start
During the current sprint planning session, take the following steps:
- Create the future sprint: Create the upcoming sprint in the JIRA backlog. This will serve as a staging ground for the upcoming sprint. You could also just pre-create all six sprints for the quarter ahead of time to serve as buckets to allocate work to in advance.
- Prospect: Start moving any follow-up tickets or future work from your backlog into that upcoming sprint as you are reviewing the current sprint.
Part 2: One week prior to the sprint start
One week before the start of the sprint, begin populating the sprint with tickets from the backlog. Follow these guidelines:
- Align on upcoming priorities: Leverage rituals such as 1:1 meetings, working sessions, and stand-ups during the week to discuss and align with team members on the upcoming priorities. Determine who will be working on each task. Each team member should be responsible for populating their sprint with tickets async.
- Ensure sprint backlog is fully populated: 1–2 days prior to the sprint start date, ensure that the upcoming sprint is fully populated with tickets. Each ticket should have an assignee and be appropriately story-pointed. This can happen individually async but you can hold optional sprint planning office hours for any last-minute discussion and alignment.
- Add thematic focus to the visual roadmap: Update the high-level visual roadmap with the thematic focus of each individual’s sprint. This step provides a clear understanding of each team member’s responsibilities and aligns them with the overall goals. This can be done during office hours or asynchronously, ensuring that everyone is on the same page.
Part 3: On the day of the sprint start
During the sprint kickoff/review meeting, follow these steps:
-
Complete the current sprint: Close the current sprint and ensure that any remaining tickets are completed or appropriately moved to the following sprint.
-
Review the completed sprint: Review the sprint report briefly at a high level to get a sense of where you landed. This is a good opportunity to celebrate achievements and identify any challenges or carryover work. If possible, review the results of shipped work from the previous sprint and track progress against your OKRs. This is also an opportunity to reiterate the team’s thematic goals and their connection to longer-term objectives.
-
Conduct a sprint review per person: Share the high-level visual roadmap and dive into a sprint review for each team member. Use the following checklist:
- Ensure thematic alignment: Confirm that the main thematic focus of the tickets aligns with the roadmap at a high level.
- Story point verification: Verify that all tickets are appropriately story-pointed, reflecting their complexity and effort. Bonus: See my previous post on how to estimate effort.
- Epic alignment: Ensure that the majority of tickets belong to an epic aligned with a roadmap initiative. This ensures that the work being done is driving the team towards its long-term goals.
- Anticipate bandwidth constraints: Prospect forward and consider any time off, on-call duties, or other events that could impact a team member’s bandwidth. Update the visual roadmap accordingly to avoid overallocation and underestimation.
- Load balancing: If an individual’s sprint load appears excessive, either move some tickets to the future sprint or load balance the workload with another team member.
-
Repeat for all team members: Go through the checklist above for each team member, ensuring that no unassigned tickets remain in the sprint.
-
Start the sprint: With all preparations in place, kick off the sprint.
That’s a Wrap
If you made it this far, congratulations on equipping yourself with the knowledge to run effective sprint planning sessions! Remember, implementing these practices is just the beginning of your journey toward optimized sprint planning and team success.
As you put these principles and tactical steps into action, you may wonder, “How do I know if this is working?”. One key indicator of progress is the improvement in sprint planning accuracy. Keep a close eye on the alignment between planned and actual outcomes i.e. planning accuracy or variance, and assess whether the commitments made during sprint planning are being met consistently.
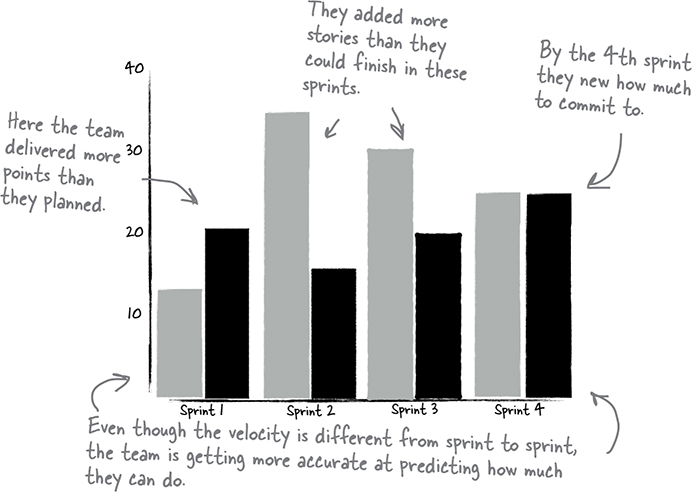 Source: Head First Agile
Furthermore, don’t underestimate the power of feedback. Retrospective meetings at the end of each sprint cycle provide an excellent opportunity to discuss what went well and what can be improved. By actively soliciting and incorporating feedback, you can fine-tune your approach over time and drive continuous improvement.
Happy sprint planning!
29 Apr 2023
From Childhood Daydreamer to Future-Minded Leader
 The Daydreamer by Morgan Weistling
As a young boy, I always had a tendency to daydream and play out things that could happen in my head.
I remember a particular incident from my childhood when an uncle of mine started a tutoring practice in the early 90s teaching students how to write code. This was back when computers were a new thing and the internet was just in its infancy.
He invited my family to tour the facility on inauguration day. He later asked me what I thought about it. In my head, I analyzed the part of town where the facility was located, what they were teaching, and the perceived demand for those kinds of courses at the time. Without thinking much, I blurted out a rather honest and brutal assessment. I told him that it wasn’t going to be successful. Keep in mind, I was just a 12-year-old boy at the time, so luckily, everyone took it rather lightly and had a good chuckle. Fast forward a couple of years, and he ended up shuttering the business.

It was a setting very much like this one (source)
Over the years, I developed a habit of playing out things in my head this way. My family, especially my dad, was well aware of my, shall we say, future-mindedness. He would often tell his friends about it, and they would have a chuckle or two at my expense.
Here’s where things get interesting. I distinctly remember one time when my dad’s friend had a messy personal problem he was dealing with. He knew about my reputation for engaging in forethought or having premonitions, according to him, and asked to chat with me and get my take on his situation. This was a bit odd to me given that I was only 13 or 14 at the time, and he was a 45-year-old man. But the whole thing had me intrigued, so I went with it.

A Father Encourages His Son At The Playground by Emily Flake
He took me through the predicament he was in detail. In the end, I told him I see it all working out in his favor eventually. Maybe it was framing bias. By then, I had gotten into a habit of never explaining my train of thought but just giving them the “answer.” That’s what they were interested in anyway, and I didn’t have the interest or energy to debate the logic of my reasoning.
Fast forward a few years, and the situation played out just like how I had predicted, much to the excitement and relief of our family friend. This experience made an impression on him. So much so that offered to introduce my family to a journalist he happened to know in a prominent global magazine publication (rhymes with the word dime) at the time.
The idea was that he could write a little story about me and my “psychic abilities.” Whoa, I thought. I’m no psychic. Luckily, my parents were on the same page and felt like that would be a terrible idea to put a spotlight on me at such a young age. It would likely attract all the wrong kinds of attention. Now looking back it was almost like a Minority Report precog origin story. I’m glad we walked off that ledge.

Precogs from Minority Report
Fast forward 25 years, and now I finally realize that what I was engaging in is known as prospection in psychology. I was tapping into an innate human ability to anticipate and evaluate future possibilities.
During my time at BetterUp, I had the privilege of learning more about this topic. According to Tomorrowmind, a book authored by Gabriella Rosen Kellerman and Martin E. P. Seligman, two esteemed members of the company’s science board, daydreaming is not merely a form of idleness, but instead an important catalyst for prospection, creativity, and innovation. This insight has helped me better understand the value of letting my mind wander and appreciate the benefits it can bring.
This process is facilitated by a group of brain areas known as the default mode network (DMN), which becomes active when we’re not focused on a particular task. The DMN is particularly skilled at helping us imagine and plan things, and when we start daydreaming, it turns on and we start making new connections and ideas. While many of these initial ideas may seem like gibberish, a few will offer enough value to pique the interest of other networks in the brain, which will sense, refine, and further develop these ideas (source).
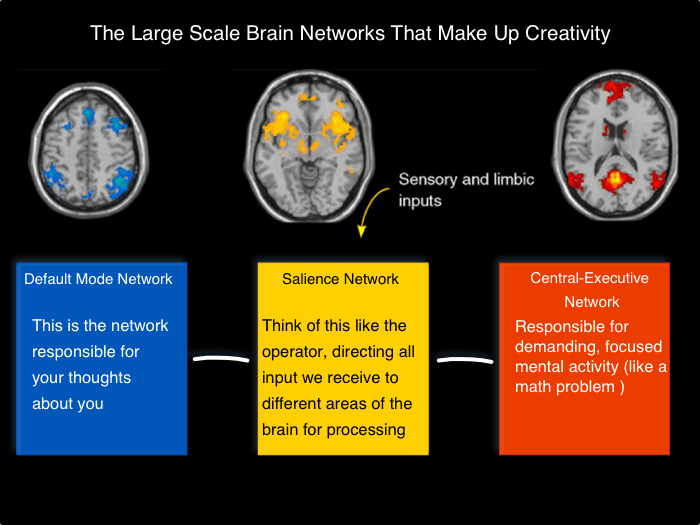
The Default Mode Network
So while I’m still not a psychic, I’ve leaned into that ability to engage in creativity and prospection by intentionally engaging what I now know is my DMN, which has paid dividends in my engineering career, where anticipating problems and coming up with creative solutions is a big part of the job.
Although the key to this is to be very intentional about daydreaming and prime your DMN. Here are some tips on how to do that:
- Carve out time for daydreaming: Set aside some time each day to let your mind wander and engage in free thinking. This can be as simple as taking a walk or sitting in a quiet space and letting your mind roam.
- Focus on positive possibilities: When daydreaming, focus on positive possibilities and outcomes. This can help activate your brain’s reward system and boost your motivation and creativity.
- Use visual and sensory cues: Engage your DMN by using visual and sensory cues to help trigger your imagination. For example, you could use a vision board, a journal, or a specific scent to help you tap into your creative flow.
- Practice mindfulness: Mindfulness can help quiet the chatter in your mind and create space for deeper thinking. Consider incorporating mindfulness practices like meditation or deep breathing into your daily routine.
- Seek out novel experiences: Novel experiences can help activate your brain’s reward system and encourage prospection. Try new activities, travel to new places, or read about unfamiliar topics to keep your brain engaged and curious.
So go ahead, let your mind wander, and see where it takes you. You never know, it might lead you to your next big thing!
02 Mar 2023
Building a culture of inclusive technical interviews

“Team leads review candidate’s whiteboard, binary-tree inversion solution” from Classic Programmer Paintings
As a candidate in my early career, I experienced all sorts of technical interviews, ranging from being asked to write an algorithm on a piece of paper with an ink pen (not kidding) to doing leet coding in an IDE. Looking back, the best experiences were when the interviewer wanted me to succeed, was empathetic, and presented me with a problem that reflected how I would solve problems in the real world without gotchas.
Since then, I’ve been on both sides of the table hundreds of times and reflected a lot about the problem that plagues technical hiring: how to assess whether a candidate is both technically proficient and has the right mindsets and behaviors to succeed in your organization.
Most organizations have a technical interview process that attempts to evaluate both qualities to varying degrees of success. They may also use platforms like HackerRank or Karat to assess technical strength. But all too often, these approaches can lead to suboptimal outcomes, filtering out great talent or, worse, providing a poor candidate experience that hurts the company’s reputation.
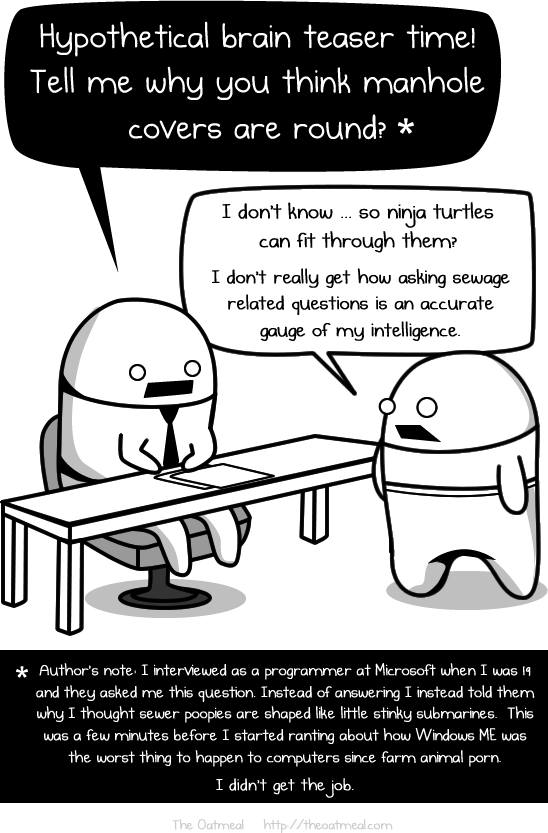
We all know the head-scratching brain teaser, “Why are manhole covers round?” that was part of the Microsoft interview loop, which has become somewhat of an industry joke.
Also, we’ve seen some famous examples, such as the creator of Homebrew getting rejected by Google because he couldn’t solve a leet code problem. In fact, this is such a prevalent problem that engineers have started maintaining a list of companies that don’t have a broken hiring process.
Most hiring managers, including myself, will admit it’s hard to nail technical interviewing if we are not super intentional about it. In my experience, I’ve observed several pitfalls we should all keep in mind if we want to build an inclusive hiring culture — or, dare I say, “fix” technical hiring.
With this post, I’m hoping to highlight some of those anti-patterns, or what a good technical interview is not, and then dive into some things that make for an exceptional interview.
Anti-Patterns
So let’s first start with attributes that may seem like logical things to assess on the surface but aren’t representative of real-world experience and are likely to filter out great candidates
Memory
Simply recalling syntax, algorithms, concepts, or talking points doesn’t necessarily signal that someone will be a great engineer — it just shows they can think on their feet and recall facts and figures. Maybe they have spent a lot of time memorizing concepts without a deep understanding.
It’s always best to let the candidate look up information if it involves remembering specific details or, even better, having links to relevant references handy to share with them to save time.
Speed
Measuring the speed at which a candidate solves a problem doesn’t always correlate with how effective or efficient they’ll be in their day-to-day work. They may have just practiced a lot for coding challenges or interview questions. In fact, you may be doing a disservice to yourself by filtering out slow thinkers or neurodivergent candidates that are likely to not shine thinking on their feet.
Best Practices
Alright, so what makes for a good interview? In my experience, it’s essential to recognize that a successful interview is not just up to the candidate; the interviewer also plays an equally important role. Here are some attributes to get right in order to conduct an effective technical interview.
Upfront
There is no advantage to creating a surprise factor. Give candidates a heads-up about the attributes or topics the interview will cover and any other information you can reasonably share upfront.
Consider using a candidate experience platform such as Guide, which makes it easy to set up an engaging candidate hub with all the information they need in one central place. This will go a long way in reducing anticipation anxiety and allow the candidate to show up confidently.
Realistic
The interview should aim to assess the candidate’s deep understanding of concepts and skills that reflect what they will be doing in their day-to-day job. Rather than focusing on shallow technical concepts like a quick sort algorithm, ask questions that require a deep understanding of what the candidate will actually be working on, like building an API or a small service for example.
Some ways to make it even more realistic beyond the standard interview format:
Paid Trial — Offer the candidate a small paid project with you and your team. Of course, this is a very time-consuming process, so it’s more realistic when you don’t need to hire at a fast clip.
Take Home — Provide a take-home assessment option for candidates with a live component to discuss the solution they came up with to get signals on a deep understanding of what they’ve put together. The industry is split on take-homes, and there are several tradeoffs to the live whiteboard vs. the take-home, as laid out here by Andrew Rondeau but offering candidates a choice can help strike a balance.
Pair Programming — Another option would be to have one of the senior engineers on the team pair with the candidate on a problem where they would build on an existing project by adding a feature or two. This would give them a sense of what it would be like to collaborate with them while also closely mirroring how engineers solve problems in the real world.
Structured
A mountain of research-backed evidence shows that unscripted conversations are ineffective and lead to biases, interviewer idiosyncracies, and reduced hiring accuracy.
Ensure you have a set of attributes you look for and are aligned internally across the interview team to ensure a consistent candidate experience. For example, you could aim to get signals on dealing with ambiguity, code structure, testing, and user experience. You then want to ensure all interviewers know what great looks like for each. Ideally, you have a point-scoring system to determine how a candidate performed.
When you add new interviewers to the pool, ensure they are well-calibrated with the rest of the group by having them shadow and reverse-shadow interviews. After each interview, they should debrief with their counterparts to ensure they are aligned on the score. This will ensure interviewers’ subjectivity and personal biases are not creeping in.
Guided
Setting some expectations and guiding the candidate through the interview is important. Don’t expect them to read your mind in terms of what you are looking for. For example, I always tell the candidate upfront how I would like to spend our time by setting the agenda and expectations for each interview portion.
You know the attributes you need to get signals on. If the discussion is not going in a direction that will yield valuable signals, steer the candidate back on course.
Don’t hesitate to interrupt and ask if the candidate missed something. I promise you are not “giving away” the answer to the test. This is not an academic setting. In fact, this is an excellent opportunity to have a rich conversation and assess their self-awareness and communication skills.
Emphethatic
Remember that even the most experienced candidates can feel nervous or unsure during an interview. Show some empathy and try to put the candidate at ease. Acknowledge the pressure they might feel and let them know there are no “gotchas” in the interview. Imagine how you would have felt in their shoes, and think about what would have improved the experience.
Don’t forget to get back to the candidate after the interview in a reasonable amount of time, ideally no more than 72 hours, to inform them about the decision. If you are not handling the comms with the candidate, ensure your internal team receives your post-interview feedback ASAP so they can keep the process moving.
Conclusion
Ultimately, it’s important to remember that technical hiring isn’t just about finding the most technically proficient candidate — it’s about finding the right fit for your team. Creating a realistic technical assessment can help you identify top talent and build a strong, diverse team ready to tackle any challenge.
And remember, it’s not just about what the candidates can offer you — they’re also evaluating your company and the hiring process. So, it’s crucial to create a positive candidate experience that shows them you value their time and contributions. By being empathetic and understanding during the interview process, you can make your company stand out as a great place to work.
03 Jan 2023
Are you tired of constantly struggling to remember important information? Do you feel overwhelmed by the endless stream of inputs coming at you every day? You’re not alone. In today’s digital world, we’re bombarded with an average of 74 GB of data per day - that’s the equivalent of watching 16 movies! (source)
But what if there was a way to take control of all this information and use it to your advantage? Enter Personal Knowledge Management (PKM).
📔 What is Personal Knowledge Management?
 (Source: RoamBrain.com)
PKM is the active and intentional process of managing the information that comes your way on a daily basis. It involves finding, organizing, and storing information in a way that makes it easy for you to access and use when you need it. It also involves using various tools and techniques to help you understand, analyze, and apply the information you’ve collected.
🤔 Why should you care about PKM?
 (Source: jasongilbertson.com)
In this blog post, we’ll explore the benefits of PKM and how it can help you create clarity, build a “second brain,” and improve your efficiency and effectiveness. PKM is an ongoing process that requires discipline and effort to maintain, but it can provide significant benefits, including:
-
Connecting ideas for new insights. Atomic bi-directional notes allow you to connect ideas and make new insights possible. Insights don’t happen in a vacuum - they’re the result of making new connections.
-
Creating future value. Even if you don’t use your notes for a current project, you’re preparing knowledge for future projects. Just as data gives organizations an advantage, your personal repository of knowledge will give you a leg up over time.
-
Tackling complex problems. It can be tough to keep all the balls in the air when you’re tackling complex problems. Implementing a PKM system allows you to focus on a small part of the problem and then step back and look at it with a bird’s eye view.
🔢 “Levels” of P.K.M
Are you already a pro at taking notes? That’s great, but there are different levels to this practice. You can evaluate where you are in your PKM journey using this guide from Tiago Forte’s The 4 Levels of Personal Knowledge Management:

Level 1: Storing Information
- You use apps to receive, edit, and send information.
- You organize your files using default folders and subfolders.
- You take notes on your smartphone or mobile device for practical tasks or occasionally from sources such as books or podcasts, but don’t do much with them.
Level 2: Managing Knowledge
- You capture ideas and creative inspiration from both your own thoughts and external sources.
- You use digital note-taking as a significant part of your daily life, capturing information from a wide variety of sources.
- Your notes begin to work as a thought partner, reminding you of things you’ve forgotten and surfacing connections between ideas.
- You refine your knowledge management tools and perform small experiments to discover better ways of doing things.
Level 3: Enabling Action
- You shift your focus from ideas to action, using your insights to tangibly improve your learning, health, career, business, and society.
- You become more selective about the information you consume, preferring only high-quality, substantive sources that relate to your goals.
- You use your notes to take on more complex projects and become more productive, creative, and relaxed.
- You apply creativity to the workings of your system and integrate it deeply into your thinking for leverage.
- The benefits of your system extend to others, such as through a website, blog, social media feed, podcast, or product.
Level 4: Personal Knowledge Mastery
- You have achieved a high level of proficiency in managing your personal knowledge.
- You are able to use your knowledge effectively to achieve your goals and are constantly learning and adapting to new information and situations.
- You regularly review and revise your system to ensure it is still effective and efficient.
- Your system becomes a part of your identity and personal brand, and you are able to share your knowledge and insights with others in a way that is meaningful and impactful.
🤓 Building Your PKM System
Now you may be thinking, alright, how do I level up my game? What do I need to do? First things first, you need the right tool for the job.
 (Source: NoteApps.Info)
As you probably know, there are tons of apps in the market. Which one do you choose? Is there even a difference?

The app you choose is going to determine how successful you are going to be in organizing your knowledge. You don’t want something super complex where all you think about the tool and not why you are using it and on the other hand you don’t want something so simple that it lacks the essentials.
🧐 Understand Your Needs
In order to narrow down the search out of the sea of apps, I recommend thinking about a set of requirements that are important to you based on your usage and thinking patterns. For example, consider the following questions:
- How do you prefer to take notes? Do you write in bullet points or prose?
- Do you care about referencing other notes and seeing backlinks?
- Do like the concept of a daily planner?
- Do you care about consolidated notes, calendar, and task management?
- Will you use it on the go and on multiple devices?
For me, thinking through some of those questions yielded the following list of requirements:
🔗 Requirement #1: Bi-directional - The ability to create connections between different blocks of knowledge and easily reference and backlink them.

📋 Requirement #2: Outline-based - The ability to organize thoughts and ideas in a hierarchical, bullet point format.

📅 Requirement #3: Temporal - The ability to take daily notes and keep a journal of events and activities.

✅ Requirement #4: Action Oriented - The ability to create and track tasks, ensuring that important actions don’t fall through the cracks.

📲 Requirement #5: Multi-device syncing - Mobile support for on-the-go note taking as well as multi-device syncing.

🧪 Experiment
A good way to narrow down your options is to use a review site like NoteApps.Info to compare different tools and see which ones seem most promising.
Once you’ve identified a few tools that you’d like to try, it’s a good idea to give each one a test run for a few days to see how it fits into your daily routine. Keep in mind that it may take some trial and error before you find a tool that feels productive and comfortable to use.
For example, I tried all of the following tools for a few days before finding one that worked for me:
- Roam Research: This is the leader in the space with a cult following. It offers powerful bi-directional linking and hierarchical outlining capabilities. No free version.
- Obsidian: Similar to Roam but with a ton of extensibility and plugin ecosystem. Multi-device syncing is a paid add-on.
- RemNote: Similar to Roam but slightly bent towards students and educational use-cases.
- logseq: Essentially an open-source version of Roam focused on privacy and data portability. Lacking robust multi-device syncing.
- Amplenote: Most low-key out of the ones. Has the most essential features with robust multi-device syncing and mobile support. No plugins or ability to customize the UX. Generous free tier.
I ultimately decided to stick with Amplenote given it checked all my requirements and has proven to be super reliable for me.
💡 Strategies for Success
So now that you know the benefits of PKM, how do you get started and make it stick? Here are some strategies that can help you achieve success:
- Start small and focus on one area at a time. It can be overwhelming to try to tackle everything at once. Start with one area of your life, such as taking meeting notes, remembering ideas, writing blog posts, planning a vacation, etc and build from there.
- Find a tool that works for you. There are many different tools available for PKM, from simple note taking apps to more advanced knowledge graph apps. Take the time to experiment with different options and see what sticks.
- Use your notes to reflect on your learning and progress. PKM isn’t just about capturing and organizing information - it’s also about making use of it to improve your learning and development. Take time to review and reflect on your notes regularly, and use them to identify patterns, make connections, and track your progress over time.
- Be consistent and make PKM a habit. It takes time to build a strong PKM system, so be patient and consistent in your efforts. Make it a habit to capture and organize information on a regular basis.
📑 Additional Resources & Examples
- How to Build a System for Lifelong Learning - I highly recommend this post by Jason Gilbertson where he takes you through his knowledge management system to serve as an inspiration.
- Building a Second Brain - If you prefer something more guided and structured look no further than Tiago Forte’s BASB course.
- Andy’s Notes - One of the most remarkable examples out there. Andy uses the concept of atomic, evergreen notes, and combines it with a fun way to navigate the content as you open up each note like a book. Each note title = hyperlink.
- KasperZutterman/Second-Brain - A curated list of awesome Public Zettelkastens 🗄️ / Second Brains 🧠 / Digital Gardens 🌱
📣 Share The Knowledge
I hope you found this post helpful and thought-provoking. If you have any additional tips or strategies for effective Personal Knowledge Management, please share them in the comments below. And if you found this post valuable, please consider sharing it on social media or tagging a friend or colleague who might benefit from reading it.
22 Jul 2022
An engineer’s journey from a junior to a lead is full of learnings and requires frequent adaption and agility to succeed. But, as this Tweet mentions, what ends up needing most of the time and focus at each engineering level tends to be different.
What got you here will not get you there.
The best and most successful engineers realize this and adapt to meet the need at the moment rather than clinging to what got them so far. They are what Liz Wiseman calls Impact Players — a book and a mental model I highly recommend.
In this post, I will take you through a mental model of thinking about your growth as an engineer, techniques to advocate for yourself, and advice on organizing your thoughts and communicating well.
The Rigor/Relevance Framework®
So the first question that you may have is, how should I operate? How do I know when to focus on learning, building, or something else?
Here comes a structured tool you can leverage called The Rigor/Relevance Framework®, developed by the International Center for Leadership in Education to examine curriculum, instruction, and assessment.
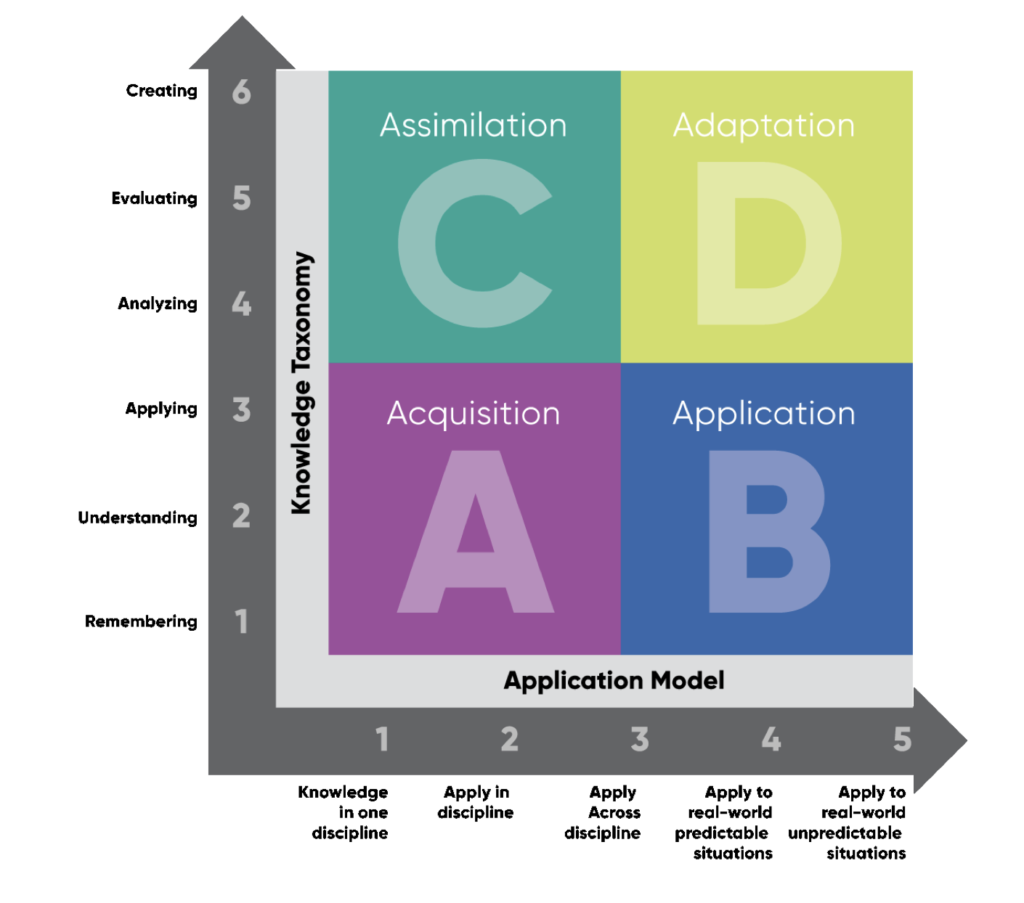
As you might guess, they typically use this framework in education settings to chart a student’s growth of knowledge and how they apply it. It is an excellent lens to view an engineer’s growth because great engineers are lifelong learners who follow a similar trajectory!
You can use this framework as a guide to track where you are now and where you might go next as a software engineer. We can examine the expectations at each level and how you can grow your impact and reach the next one.
Quadrant A (Acquisition) — Junior Engineer
You are an early stage engineer as an intern, your first job out of school, or switching industries.
Your manager will probably expect you to gather and store bits of knowledge and information. They will also expect you to remember or understand this acquired knowledge. Your team mentor, manager, or tech lead will guide you in completing your tasks.
You can exceed expectations if you understand and leverage existing patterns & practices, as well as execute tasks with minimal guidance. For more, see Samuel Taylor’s brilliant advice on how to join a team and learn a codebase.
Quadrant B (Application) — Mid-Level Engineer
You are a mid-career engineer with a few years of experience and maybe in your second or third job as an engineer.
Your manager will expect you to use acquired knowledge to solve problems, design solutions, and complete work more or less independently.
You can exceed expectations if you can quickly ramp up and contribute to a new team/domain and apply your knowledge to new and unpredictable situations.
Quadrant C (Assimilation) — Senior Engineer
You are a veteran engineer who has worked in the industry for about a decade. You are the driver of your work streams and a mentor to others.
Your manager will expect you to extend and refine your acquired knowledge to expertly and routinely analyze and solve problems and create unique solutions.
You can exceed expectations by consistently stepping into a leadership role and helping your team take complex projects to the finish line by working closely with stakeholders, identifying solutions, defining the scope, estimating timelines, and measuring success. You know how to be what Keith Rabois calls a Barrel.
Quadrant D (Adaptation) — Staff+ Engineer
You are a technical craftsperson and have been in leadership roles in the industry. You typically lead teams and companies on strategic and mission-critical initiatives. In addition, you are a compassionate mentor that can guide individuals and teams to achieve greater success.
Your manager will expect you to think in complex ways and apply your acquired knowledge and skills. However, even when confronted with perplexing unknowns, you can use your experience to create solutions and take action that further develops your skills.
You can exceed expectations by practicing imagination, prioritizing the right things at the right time, and executing your vision by inspiring and leading others. See Will Larson’s guides for reaching and succeeding at Staff-plus roles for a deep dive.
The map is not the territory.
Organizations essentially split those four quadrants above into different levels at varying granularity, but the core concepts usually remain the same. Therefore, you can think of the above levels as a map for your career progression.
Although these leveling guides are helpful, it is essential to remember that even the best maps are imperfect. In mathematician Alfred Korzybski’s words, the map is not the territory. That’s because they are reductions of what they represent. If a map were to describe the territory with perfect fidelity, it would no longer be a reduction and thus would no longer be helpful to us.
That is all to say, don’t read the leveling guides too literally or get fixated on ticking the boxes. Instead, take the time to explore your interests, learn and savor the journey. Personally, I took several detours along the way, such as pursuing entrepreneurship and switching back and forth from IC to management to maximize my learnings & impact rather than worrying about titles or showing linear growth on my resume. For more, see Charity Majors’ thoughts on engineering levels.
Also, it’s essential to remember that titles are usually a byproduct of all your achievements. They are a lagging indicator of your impact. Therefore, you should never wait for titles to work on your skills and find your flow state. Psychologist Mihaly Csikszentmihalyi describes the flow state as:
a constant balancing act between anxiety, where the difficulty is too high for the person’s skill, and boredom, where the difficulty is too low
Do you have the right opportunities, mindsets, and support to achieve that flow state and create a greater impact? If not, what needs to change?
Be your advocate
Following and meeting the expectations of a leveling guide alone sometimes is not enough. It’s also crucial that you become your advocate and authentically tell your story. For one, make sure you have a way to remember, celebrate, share, and learn from all your accomplishments.
Reflecting on your journey will help you spot trends, key strengths, and areas of improvement. I’ve found it easier to jot down my thoughts right after passing a milestone, such as at the end of the quarter or after completing a project. I’ve also found it helpful to track my time using tools like Toggl, RescueTime, etc., to understand and visualize my time pie.
You can use those reflections as a springboard to share your achievements & insights more broadly. I know that may not always come naturally to some engineers, but putting yourself out there will help others, amplify your work and unlock new opportunities. It is also a great opportunity to practice gratitude and recognize others around you.
Related to the points above, see Julia Evan’s excellent blog post on how to get your work recognized and Jason Roberts’s blog post on increasing your luck surface area.
Communicate well
Another critical skill often overlooked is an engineer’s ability to write and communicate. Make sure you invest in that skill as early as possible in your career. It will pay long-term dividends unlike any other. In fact, your ability to advocate for yourself hinges on your ability to communicate well.
Clear and concise communication will also help you think through complex concepts more clearly. It is also a huge plus when working at a company that values written communication, such as Amazon’s, with a culture of six-page memos, which Jeff Bezos talked about in one of their shareholder letters.
To build this skill gradually, I’ve used Personal Knowledge Management (PKM) tools, such as Notion, Roam, Remote, etc., to create a daily writing practice and a way to organize thoughts. You can then leverage those raw thoughts and outlines to write polished documents. Set a goal for yourself to write a certain amount of external blog posts or internal memos. Start small, maybe 2 - 3 per year, and slowly increase the cadence.
For more on writing well, check out Heinrich Hartmann’s Writing for Engineers guide and Michael A. Covington’s presentation on How to Write More Clearly, Think More Clearly, and Learn Complex Material More Easily.
Final thoughts
To recap, the core tenets of owning your growth as an engineer covered here were:
- What got you here will not get you there; do the job that’s needed of you
- Understand what it’ll take to exceed expectations and have a plan to outperform
- Advocate for yourself through storytelling and sharing your work
- Learn to organize your thoughts and communicate articulately
I would love to hear if that resonates and if there is any other advice you’ve found to be pivotal in your growth journey.
This post was originally published on the BetterUp Product Blog.
