Pull Requests (PRs) are a great way of submitting contributions to a project, especially when there are multiple developers working on it at the same time. If done well, they are a medium through which we can receive feedback and increase visibility for the changes we are shipping.
There are many elements to what makes for a good PR. They end up determining the quality of the end deliverable as well as telling a story of how a certain feature or change came about.
In this post, I’ll cover some of the basics of what to optimize for at each stage of the PR’s journey to production. My hope is that you’ll be able to use this to maximize feedback quality and minimizing time to merge. So let’s dive in.
Scoping
The first step in the journey to crafting a PR is to create a separate branch for your changes. At this stage, scoping your changes is key. First, think of how big of a change-set you want to introduce in a single PR. Try to address one issue or build one feature within the PR. The larger it is, the more complex it is to review and the more likely it will be delayed. Remember that reviewing PRs is taking time from someone else’s day!
Once you’ve settled on the scope, ensure that each change is broken up into small logical commits. Having small commits is valuable because of several reasons. First, it allows the reviewer to see the progression of the changes and understand the PR in its current state. It is also very valuable if you are using git bisect to debug an issue or trying to roll back a change in the future.
Drafting
The next step in the journey is to open up a draft PR. This is not always necessary but it’s useful if you want to see the full CI run with all the tests, assuming you are not running the entire test suite locally. This will give you early signals on whether your changes are interacting with the rest of the codebase in unexpected ways or not.
Take a moment to review your changes and see if everything makes sense from the perspective of the reviewer. If you are satisfied with the state of the PR, you could tag reviewers for early feedback if necessary.
If you do decide to tag reviewers, ask for specific feedback, calling out the fact that the PR is still work-in-progress. Guide your reviewers with what you want feedback on. This will ensure they don’t spend time and energy giving you feedback on things that are likely to change, or things that you are already aware of.
Publishing
If your draft PR is in good shape, you are now ready to tag reviewers. When it comes to picking reviewers, pick no more than 2 - 3 primary reviewers. If you tag a large number of reviewers, chances are you might see a bystander effect.
Before tagging reviewers, ensure that:
Tests are all green. You don’t want the reviewers to spend their valuable time pointing out the basics.
You’ve clearly articulated the purpose of the PR as well as the broader context for the change. Link back to relevant Slack threads or tickets. This is important even if you think the reviewers will have the full context for the sake of posterity.
You’ve done a self-review. I would recommend running through Maslow’s pyramid of code review to see if your work meets those criteria. You should be the first person to critically review your work before anyone else does.
If there are specific follow-ups that you have in mind, describe those as well so the reviewers know what to expect down the line.
You have provided related artifacts to the PR in the form of screenshots, videos or logs. This will help your reviewers better understand the impact of your changes.
Feedback
When you receive feedback from the reviewers keep in mind:
Tone can easily get lost in async communication. So assume the best intent and don’t take the feedback personally. Offer clarification and context for your decisions.
If something isn’t clear, ask clarifying questions, don’t try to read the tea leaves. If things are still not clear in async conversation, request some time to chat on a call. Once you’ve had a chance to discuss, circle back and summarize the discussed points in the PR to preserve context.
Whether you decide to take the feedback or not, be sure to acknowledge the feedback you’ve received. This demonstrates that you value the reviewers’ time and effort.
Explicitly re-request review once you are done addressing the feedback. Don’t assume the reviewer will know when you are done. Bonus points if you follow-up with a comment pointing out the specific commit that addressed their feedback.
Releasing
Once you have gone through the feedback cycles and gotten the approval of reviewers remember to come back and merge your PR. The longer you wait, the greater the chances of encountering merge conflicts or regressions. So be sure to merge as quickly as possible.
If you are releasing a PR that will perform a large data operation or change something in the critical path, ensure that you are available to follow that PR through the release process and mitigate any errors or hiccups along the way.
If all goes well and your changes are in production, remember to follow-up with the stakeholders and update them on the progress.
As builders and creative people, we are all too familiar with that question. Getting estimates right is incredibly difficult and it’s a skill that we learn slowly over time as we gain more experience building and shipping projects.
So why is this simple exercise so difficult? Oftentimes it’s because we forget to ask the right questions and make assumptions that may not be correct. Let’s examine what are these questions that we should be asking and break them down into phases.
Scoping — What is being requested and when is it needed?
Don’t assume what you think of as “done” is the same as what the party asking for an estimate would call, “done”. It is important to explicitly call out the timeline and specific deliverables before doing the exercise of estimation.
So part of that is first understanding what you are being asked to estimate. Make sure what you have in mind is an acceptable outcome for the stakeholder. If you don’t already have it, make a list of user personas and stories to align on the requirements with the stakeholder and decide on what will be in scope.
Secondly, understand the user group that should be targeted as part of the delivery timeline. For example, will the product be shipped in phases such as internal, friends & family, early access, general availability, etc? If so what does our estimate aim for? Be explicit about which release phase you are estimating for.
Technical Exploration — How will it be built?
To provide a good estimate there has to be some level of understanding of the existing system and how to go about making changes in it.
You can never know exactly all the steps you may need to take but there has to be a certain degree of confidence. Anything below 70% confidence would warrant a technical exploration or a spike to get a better understanding of the required effort.
If you are going to touch a particular aspect of the system, take the opportunity to leave it in a better state than you found it in. This is a good time to identify if there are any long-standing hotspots or technical debt that could be addressed as part of this task. Even small incremental improvements will help keep the system maintainable over the long run.
Capacity Planning — What is the level of effort?
The next step in formulating an estimate is to get a handle on the capacity. For example, based on the technical exploration, you may think something might require one week of effort. This is the most common step where the estimation effort derails.
We are not done. We still have to further refine that and ask, “Is it one week of an average engineer’s time? Or is it specifically your time?”
If you are estimating for yourself, does that account for all the meetings you have to attend? Are there any holidays coming up? Do you have any other competing priorities or commitments? Estimate the time you may have to focus on those things and add that to the estimate.
Also, does this account for time to deal with any potential hiccups or areas of high ambiguity that you may still have to be fleshed out? Figure out your confidence level after the technical exploration, then account for some additional time based on the percent of ambiguity that remains. It might be helpful to go through a Risks & Mitigations exercise here where you can list out all the areas of risks and potential actions to mitigate them.
Deployment Process — What will it take to be deployed?
We are in the final stretch, but the exercise is not over yet! Now that we are getting a better handle on the actual engineering time, let’s start to think about the process of shipping the work.
What are the review phases that you will encounter? Will the changes have to go through peer reviews? If so, what kind of cycle time can we expect from the reviewers? There may be a review/feedback cycle to each change that is shipped. How long will that take approximately?
Will there be any other reviews outside of peer reviews? Will this have to go through a design review to ensure the final product matches the designs? Will it have to go through any compliance audits such as Privacy, Security, Legal, etc? Try to gather the rough turnaround time for those.
Final Thoughts
Providing time-based estimates is always hard. It involves a slew of factors and varies from person to person. That’s one of the reasons why many teams have transitioned to a practice of assigning points to a task known as “story points”, which is an agile development practice.
Instead of time spent, the team would assign a relative complexity of a task on a point scale. The scale can be anything from Fibonacci sequence to t-shirt sizes. Over time, the team builds a better understanding of how their story points map to difficulty of a task which in turn can be used to inform timelines.
No matter which framework you decide to use, like developing any skill, estimation requires continuous practice, refinement, and learning. You’ll get better and better if you treat it as a skill that can be developed over time.
If you are running Rails specs on parallel machines with KnapsackPro, one challenge you will run into is combining the code coverage results generated by SimpleCov.
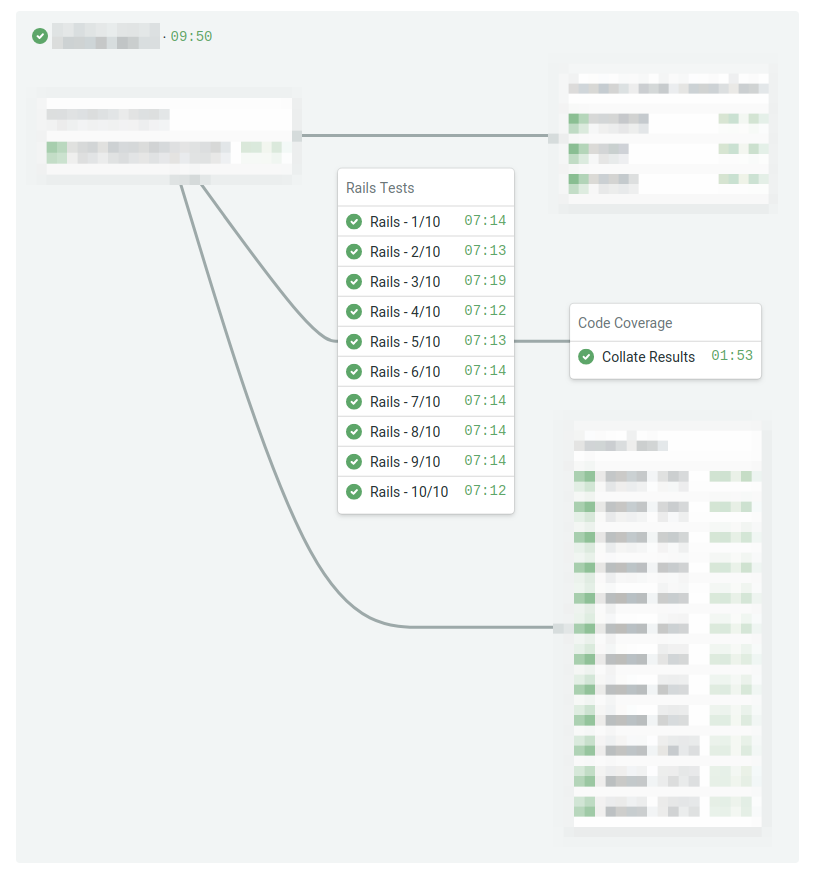
This post will show you how to generate a report of the total combined code coverage after all the tests have executed. Here’s what the pipeline diagram looks like at a high level with unrelated sections blurred out:
Configure
SimpleCov
First lets look at the config file used for SimpleCov below. Note no minimum_coverage configuration for failing the build. This is because each node most likely will not meet the minimum coverage threshold on its own so it could lead to the build failing erroneously.
Also note, before_queue hook for KnapsackPro. This is the important piece, it will set a command name based on the CI node index so that the results are recorded against it.
So now when SimpleCov a creates a .resutset.json it will have a specific key depending on which CI node it was run in like the example below. This will be useful down the line when it comes to combining the results.
Below is the relevant portions of the Semaphore CI configuration. It runs the Rails tests and then uploads the coverage results as a Semaphore workflow artifact. After all the parallel tests have completed, it will run a job to collate the coverage results from all the machines.
Below is the bash file which executes the Rails tests on each parallel machine. It sets up the Rails environment and then runs KnapsackPro in queue mode.
This is the bash file which is responsible for uploading the SimpleCov results from each machine. It compresses the coverage directory and uploads it to Semaphore.
Lastly, this is the bash file for collating all the results from Semaphore. It will download the coverage artifacts from each parallel machine and run a rake task which will collate them and then upload the results into a combined total_coverage.tgz file as shown below:
.semaphore/helpers/calc_code_coverage.sh:
#!/bin/bashset-euo pipefail
for i in$(eval echo"{1..$SEMAPHORE_RAILS_JOB_COUNT}");do
artifact pull workflow coverage_$i.tgz;mkdir coverage_$itar-xzf coverage_$i.tgz -C coverage_$idone
docker-compose -f docker-compose.semaphore.yml --no-ansi run ci bash -c"bin/rake coverage:report"tar czf total_coverage.tgz -C coverage .
artifact push workflow total_coverage.tgz
This coverage:report rake task will simply call SimpleCov.collate which will go through the coverage results in each folder and combine them into a single .resutset.json shown below
lib/task/coverage_report.rake:
namespace:coveragedodesc'Collates all result sets generated by the different test runners'taskreport: :environmentdorequire'simplecov'SimpleCov.collateDir['coverage_*/.resultset.json']endend
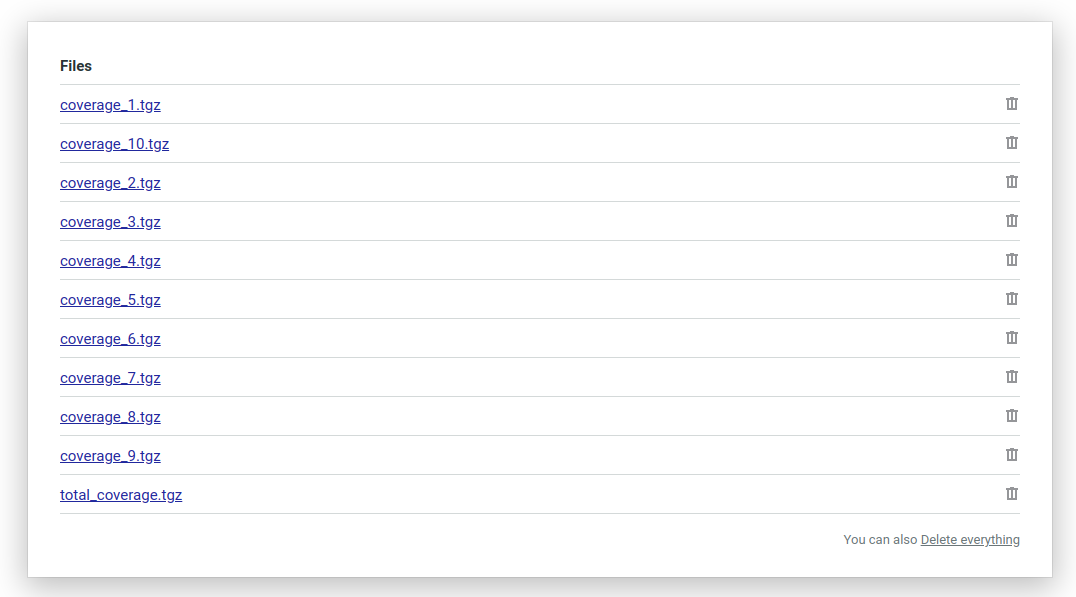
Finally here’s what your Semaphore workflow artifacts will look like. It will have a compressed coverage file generated on each machine and a total coverage file that we created at the very end:
This approach can also be easily ported over to other CI providers by simply changing the artifact push and artifact pull commands to S3 or another CI specific artifact upload command.
I hope this article was useful to you. Let me know if you have any questions or feedback.
Recently I was working on querying an API that didn’t have a Ruby SDK. So I had the opportunity to write a thin service wrapper for it. This API allowed requesting a specific page and the total number of records to include per page.
So say for example, the API returned a list of people. Here’s what that would look like:
I made a first attempt at writing a PeopleService PORO that is responsible for querying those records:
classPeopleServicedefwhere(params={})default_params={page: 1,count: 25}params=default_params.merge(params)make_request(params)endprivatedefmake_request(params)# Make external API call using the paramsendend
That would do the job if the caller writes their our own iteration logic. For instance, if we want to retrieve all the People from the API:
Although that feels a bit messy. The API contract is leaking out of the PeopleService abstraction layer that we just created.
Let’s make it Rails-y
I want my service object to follow more Rails like conventions. So in other words, I’d like to be able to iterate over the results from the PeopleService in an ActiveRecord like syntax. For example: PeopleService.new.all.each{ |person| #some operation }
Enumeration
So to achieve that, we will have to make use Ruby’s Enumerator object:
classPeopleServicedefinitialize# Setup API auth paramsenddefwhere(params={})default_params={page: 1,count: 25}params=default_params.merge(params)make_request(params)enddefall(params={})Enumerator.newdo|yielder|page=1loopdoresult=where(params.merge(page: key))result[:items].map{|item|yielder<<item}# This loop knows how to rescues from this exception and will treat it as a break raiseStopIterationifpage>=result.dig(:meta,:page,:total).to_ipage+=1endend.lazyendprivatedefmake_request(params)# Make external API call using the paramsendend
That will get us closer to what we are looking for. Using the Enumerator object above is what will give us the ability to iterate over the results returned from the all method. It will instantiate and return an Enumerable object.
That will unlock a powerful ability to chain a number of enumerators together and perform block operations on them which will make our service highly composable.
So for example, if we wanted to group the people by their location we could chain the results with a group_by function:
Lastly, you might have noticed we tacked in a .lazy at the end of the enumerable instance. What that does is makes it into an instance of Enumerator::Lazy and only returns the results that we specifically enumerate over.
So say if this API had 1,000 pages of results. Without the lazy enumerator, PeopleService.new.all would actually query all of those 1,000 pages as soon as you call it. That would be extremely slow and resource-intensive. In most cases, we might even hit a rate limit set by the API provider. What we rather want is that it only query the pages that we actually enumerate over.
So for example, if we are trying to find the person object with a specific email, it will stop querying the API as soon as it finds a page that contains Jon Doe:
Right now calling the all method again, despite it being a lazy enumerator will query the pages it has already queried. So for example:
ps=PeopleService.new# This will iterate through the pages until we find Jon Doeperson=ps.all.find{|person|person.email='[email protected]'}# Calling this again **should not** query the same pages again. We should already store the results.person=ps.all.find{|person|person.email='[email protected]'}
Similar to ActiveRecord’s query cache, we also want to cache the results from our query for performance. This is where one of the most underrated features of the Hash class comes into play.
If you instantiate a Hash with a block, it will use that block to calculate the value of the key. In our case, we can tell the hash to call the API to fetch the results of the page we are looking for.
The beauty of this feature is that it will only call the block once per key. So if the key has already been assigned a value, it will not call it again:
h=Hash.newdo|h,key|h[key]=where(page: key)endh[1]# Fetches results for page 1 fromt he API# => (500.0ms) [{...},{...},{...}]# Next call to the same key is already assigned, the block isn't executedh[1]# => (Cached 0.0ms) [{...},{...},{...}]
When using the Hash approach in our class, we will also want to make sure that we use Memoization (using the ||= operator) to ensure that the Hash itself is cached in an instance variable called all_pages.
This will allow us to call the all method multiple times after the class has instantiated and ensure the results don’t get overwritten:
Here’s what our finished product looks like after leveraging the key features of the Enumerator and Hash objects. Now our all method’s interface will be very similar to the one provided by ActiveRecord
classPeopleServicedefwhere(params={})default_params={page: 1,count: 25}params=default_params.merge(params)make_request(params)enddefall(params={})Enumerator.newdo|yielder|page=1loopdo@all_pages||=Hash.newdo|h,key|h[key]=where(params.merge(page: key))endresult=@all_pages[page]result[:items].map{|item|yielder<<item}raiseStopIterationifpage>=result.dig(:meta,:page,:total).to_ipage+=1endend.lazyendprivatedefmake_request(params)# Make external API call using the paramsendend
Usage:
ps=PeopleService.newps.all.eachdo|person|# some operation on the person objectend
Let me know if that was useful. Would love to hear about any other techniques that you’ve found particularly interesting when querying external APIs.
So a few weeks ago I stumbled upon something that reminded me of Arthur C. Clarke’s famous 3rd law — Any sufficiently advanced technology is indistinguishable from magic.
It was something I’d never seen before. It was a moment where I saw a piece of complex technology becoming easily accessible and approachable to a much larger group.
Of course, I’m talking about OpenAI’s Generative Pretrained Transformer 3 or commonly known as GPT-3. OpenAI announced that they are opening up access to it through their API which is invite-only at this point.
So far I’ve seen it described as the biggest thing since the Internet, the Blockchain, and everything in between. It intrigued me to no end and I wanted to learn more. That made me go down a bit of a rabbit hole. Here’s my attempt to summarize my findings from a layman perspective.
Show me the Magic!
Before we understand what’s under the hood, let’s see this in action.
Search Engine
Here’s a demo where GPT-3 acts as a search engine that can reply with an answer to your exact query
I made a fully functioning search engine on top of GPT3.
For any arbitrary query, it returns the exact answer AND the corresponding URL.
Look at the entire video. It's MIND BLOWINGLY good.
So you get the idea! The only limit is your imagination. So now let’s see what’s behind the curtain.
What sorcery is this?!
So the simplest way to describe what you saw in those demos would be that a computer program was fed a huge chunk of human knowledge. A user would then give it an example or two of a question-answer pair and then proceed to ask similar questions to which it will respond with accurate answers. That’s really the gist of what we are seeing in the demos.
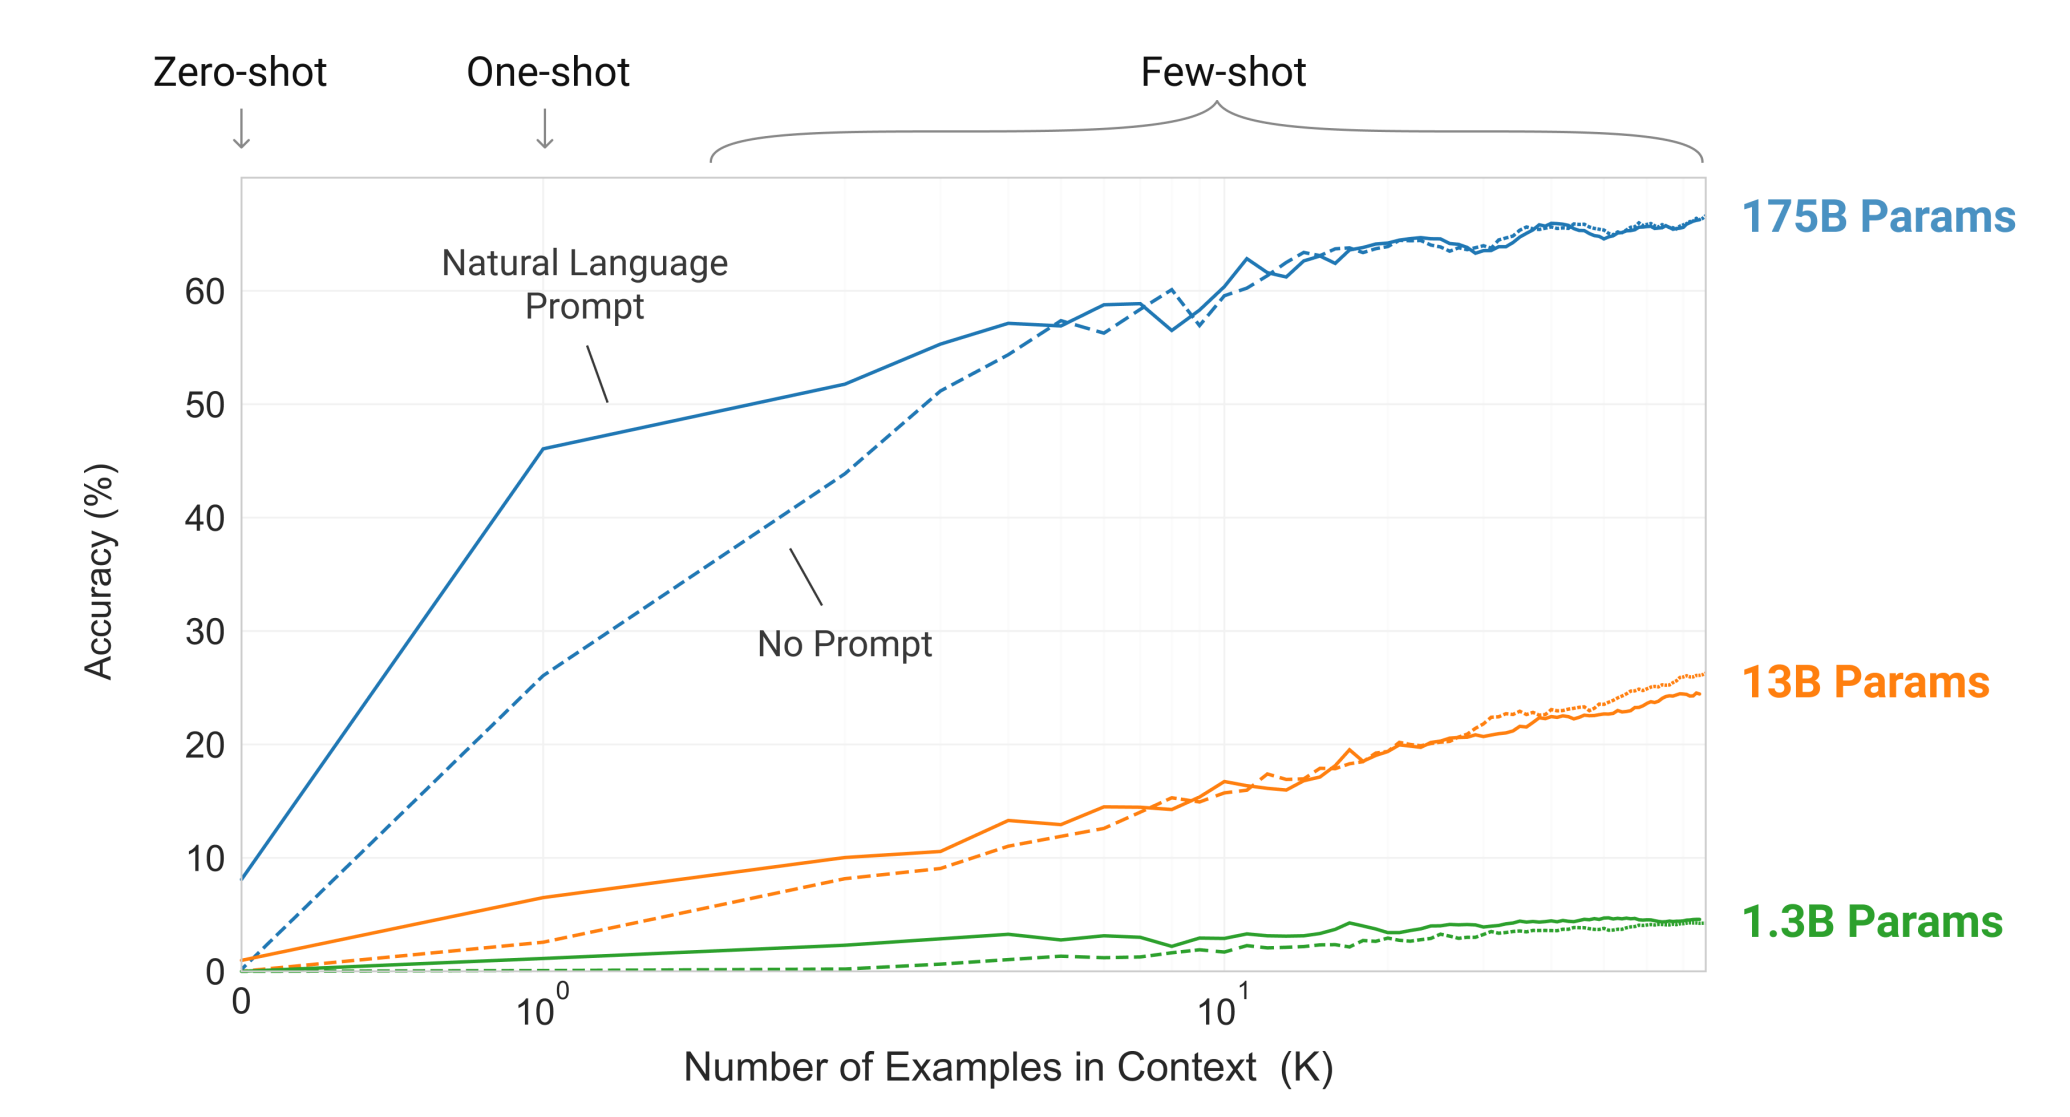
Now let’s get a bit jargony and break that down a bit. So what is it technically? It’s an unsupervised transformer language model that contains 175 billion parameters capable of few-shot learning. Whoa okay, that sounds impressive. But what does it all mean?
First, what is a language model?
It’s a program that knows the relationships between words in a language. It knows the probability of words and sentences that should appear after another. This forms the foundation of voice recognition tech like Alexa, Siri, etc
Again, summarizing the concept in the simplest way possible. The type of language model tells us how it was trained i.e how did it come up with the relationship between words and sentences in a language. In other words, it tells us how those probabilities were calculated.
Traditionally models built on the LSTM (Long short-term memory) or CNN (Convolutional neural network) have been used but they had some significant disadvantages. First, the relationship between words and sentences would be lost the farther apart they were. Second, the processing of those sentences had to be done sequentially word-by-word which meant it was slow.
Transformer, on the other hand, is a novel architecture that was introduced in a paper titled Attention Is All You. It solved both of those challenges based on the concept of “attention” which let the model directly look at, and draw from, the state at an earlier point in the sentence.
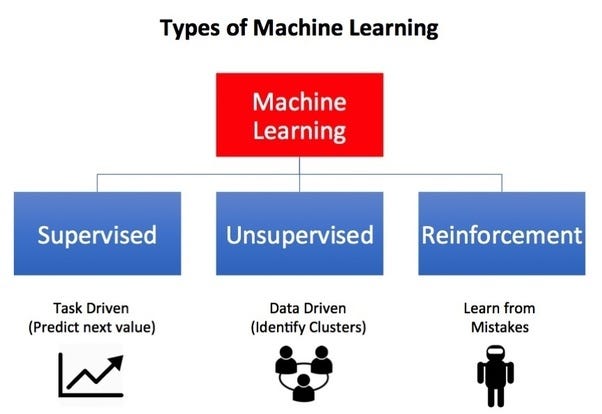
Unsupervised learning is one of the three main types of machine learning models that include supervised and reinforcement learning.
What makes it different from the other two is the fact that it doesn’t need a structured and labeled dataset nor is the algorithm incentivized for certain types of outcomes over others like for example in a game.
GPT-3 model was given a large dataset consisting of sources such as Common Crawl, Wikipedia, WebText, Books among others worth around 45 TB of text.
When that data was analyzed, simply put, the model was able to extract 175 billion different characteristics about the dataset and establish relationships between them.
According to Geoffrey Hinton — the godfather of ‘deep learning’ — parameter can be thought of as a synapse in a human brain:
My belief is that we’re not going to get human-level abilities until we have systems that have the same number of parameters in them as the brain. So in the brain, you have connections between the neurons called synapses, and they can change. All your knowledge is stored in those synapses. You have about 1,000-trillion synapses—10 to the 15, it’s a very big number. So that’s quite unlike the neural networks we have right now. They’re far, far smaller, the biggest ones we have right now have about a billion synapses. That’s about a million times smaller than the brain.
Lastly, what is few-shot learning?
In a paper titled Language Models are Few-Shot Learners researchers demonstrated that language models that have a large number of parameters like GPT-3 excel in performance even when it’s provided with very few examples of the kind of results we are expecting from it. So in other words, the more parameters it has, fewer the examples you have to provide to achieve accuracy:
Not everything that glitters is gold
Will numerous professions be put out of work? Will Skynet take over? Nope, not even close. GPT-3 while very impressive and seemingly magical has several flaws.
Data Quality & Bias
Given this model is trained on a large corpus of data on the internet, it also contains all the unpleasant things that come with it. For example, here are some instances of inherent biases and downright racist/sexist outputs:
#gpt3 is surprising and creative but it’s also unsafe due to harmful biases. Prompted to write tweets from one word - Jews, black, women, holocaust - it came up with these (https://t.co/G5POcerE1h). We need more progress on #ResponsibleAI before putting NLG models in production. pic.twitter.com/FAscgUr5Hh
— Prof. Anima Anandkumar (@AnimaAnandkumar) June 11, 2020
This is no secret and OpenAI themselves warn about it in their FAQs:
How will OpenAI mitigate harmful bias and other negative effects of models served by the API?
Mitigating negative effects such as harmful bias is a hard, industry-wide issue that is extremely important. Ultimately, our API models do exhibit biases (as shown in the GPT-3 paper) that will appear on occasion in generated text. Our API models could also cause harm in ways that we haven’t thought of yet.
Priming
So a lot depends on the quality of inputs or examples you feed GPT-3 which is called “priming”. If you prime poorly, you’ll get poor results. Since the model is trained on a massive dataset, chances are, if you give it carefully curated inputs, it will likely return intelligent outputs. How well you prime this model becomes the special sauce.
Lack of competitive advantage
That brings me to my next point. Priming is the only special sauce, otherwise, everyone has access to the same model. So whatever products you build, could theoretically be easily reproducible by competitors.
3rd party models like GPT-3 can only be a value-add on top of whatever you are offering, it can’t be THE product otherwise you will quickly go out of business. This is the reason a lot of companies will continue to train custom models on private/proprietary data and hyper optimize it for the use-case they are trying to solve. That will continue to be the way forward for any serious business applications.
This may very well change in the future as their API evolves and becomes more feature-rich. Capability to fine-tune this model would almost certainly be on their roadmap to make this appealing for any serious applications.
API Limitations / Cost
Speaking of API, we still have no idea how this API will function in a production setting. What would the latency look like? What will be the associated costs? Will there be any rate limiting/throttling? What about SLA / uptime guarantees? What about data privacy and ownership of inputs and outputs?
Where do we go from here?
While there are several limitations and challenges, OpenAI has shown us what could be possible in the future.
Remember the time the iPhone was launched? Before then Moto Razr was the hottest phone to have. The phone market was slowly but incrementally making improvements. But the iPhone completely turned the market upside down. It beautifully merged some of the advancements in hardware and software up until then into one product and made it accessible to a broader market like nobody had done before.
OpenAI’s API might just be an inflection point like that. It democratizes access to AI so that a much broader group of users can easily leverage it and build applications on top of it. It has the potential to be the AWS of modeling if they add more capabilities and build a rich ecosystem.
In the coming years, we can only expect the newer iterations of this model to get more and more powerful. After all, this is only the first step in OpenAI’s mission to achieve artificial general intelligence (AGI). An AI so powerful it can understand or learn any task that a human being can — something which is deeply exciting and terrifying at the same time.